FREE Standard Shipping with $50 Order
|
Minimum Order is $15
10% Discount on $300 Order
|
25% Discount on $600 Order

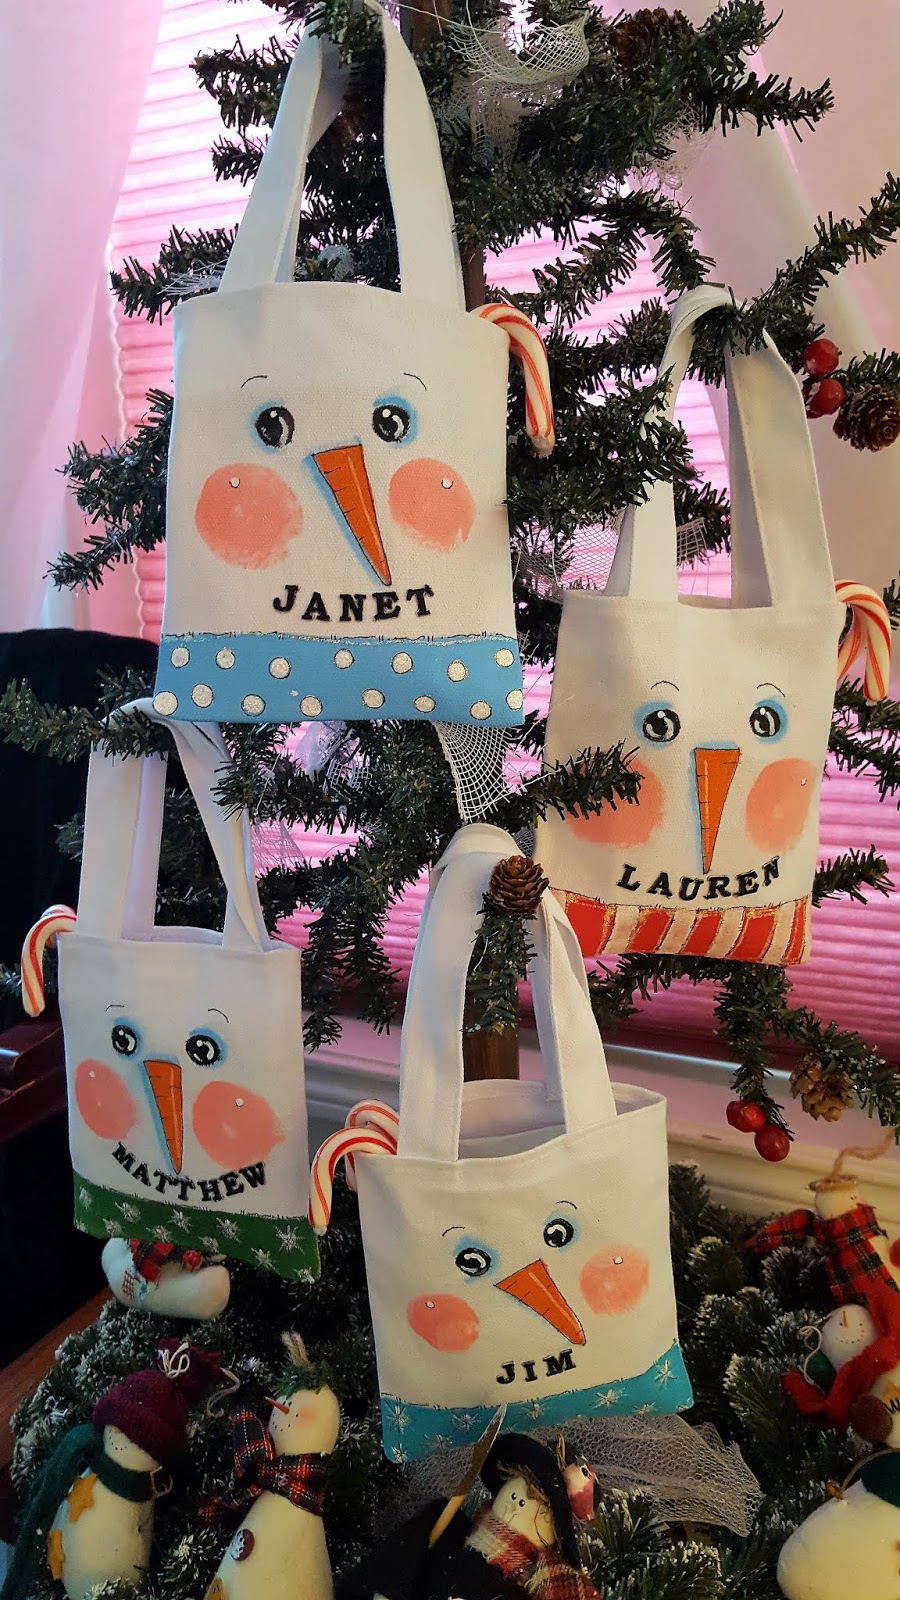
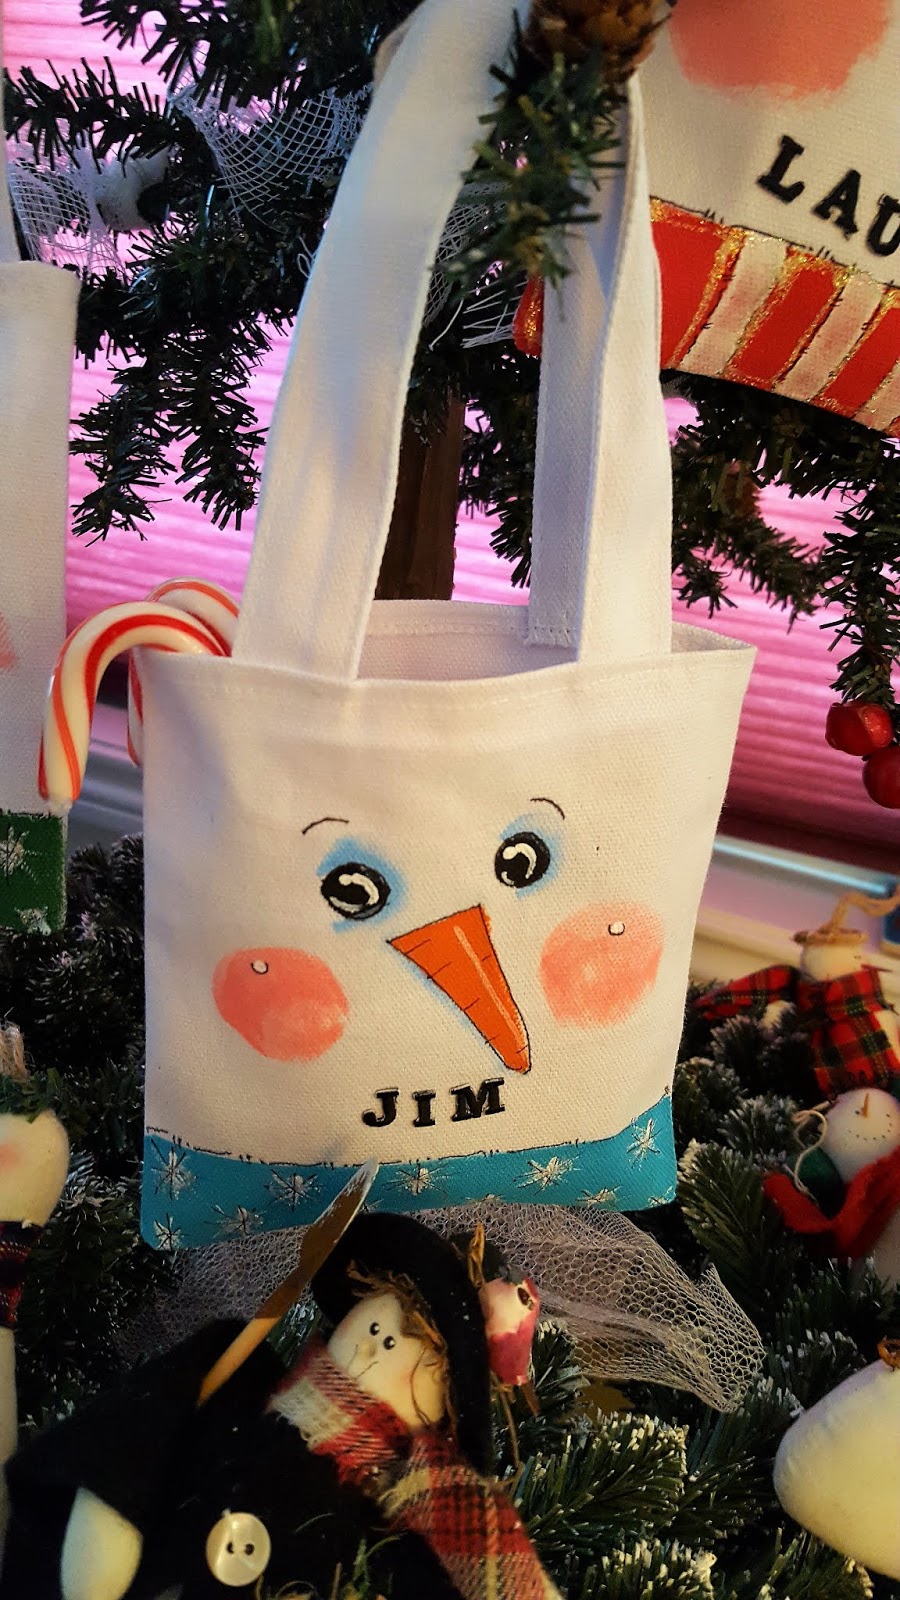
Bags of Joy for the Season

PriMarilynLy Paper
|
December 15, 2018

Do you like to paint?  If you do, here's an easy and fun project to share, just in time for Christmas!  
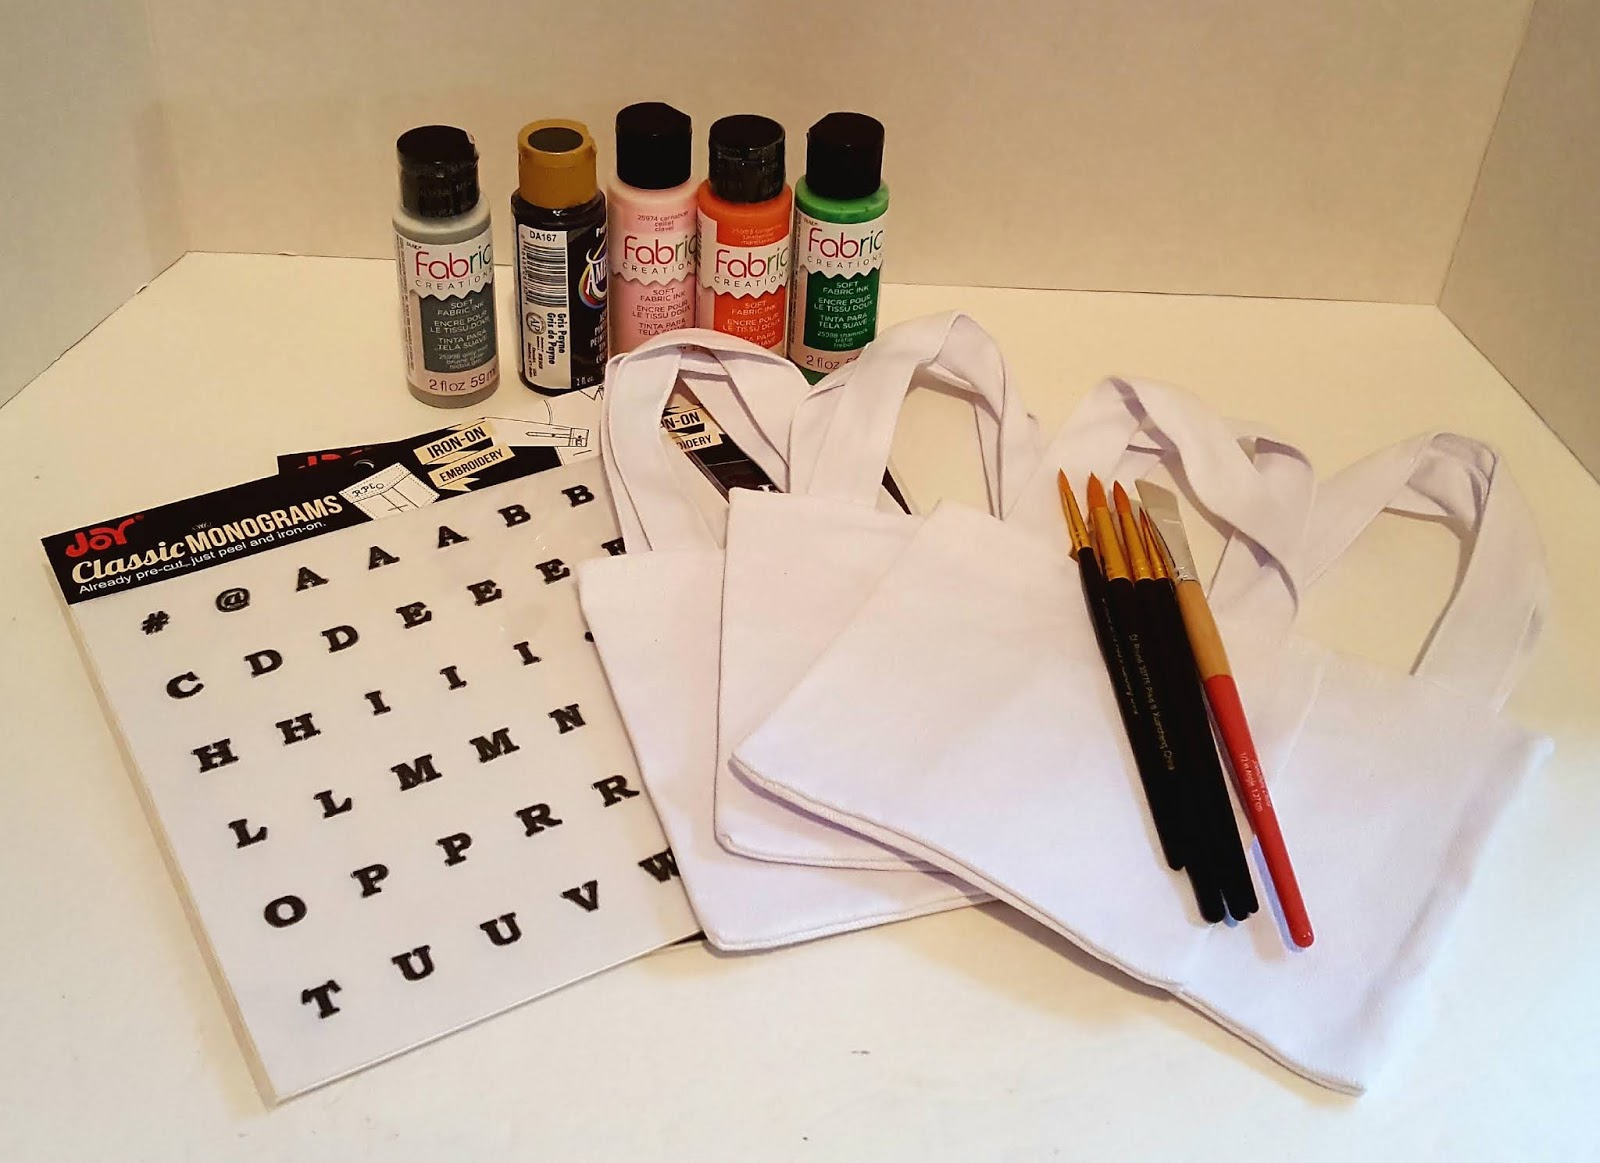
Materials:

Joy® Embroidered Letters:  5/8" classic Monograms; black

canvas craft bags:  5" wide x 10" high (to top of handles); white

craft paint (acrylic or fabric): black, white, orange, light blue and rose

paintbrushes:  small round, medium round, 1/4" & 1/2" flat shaders

permanent marker: extra fine point, black

glitter glue:  clear

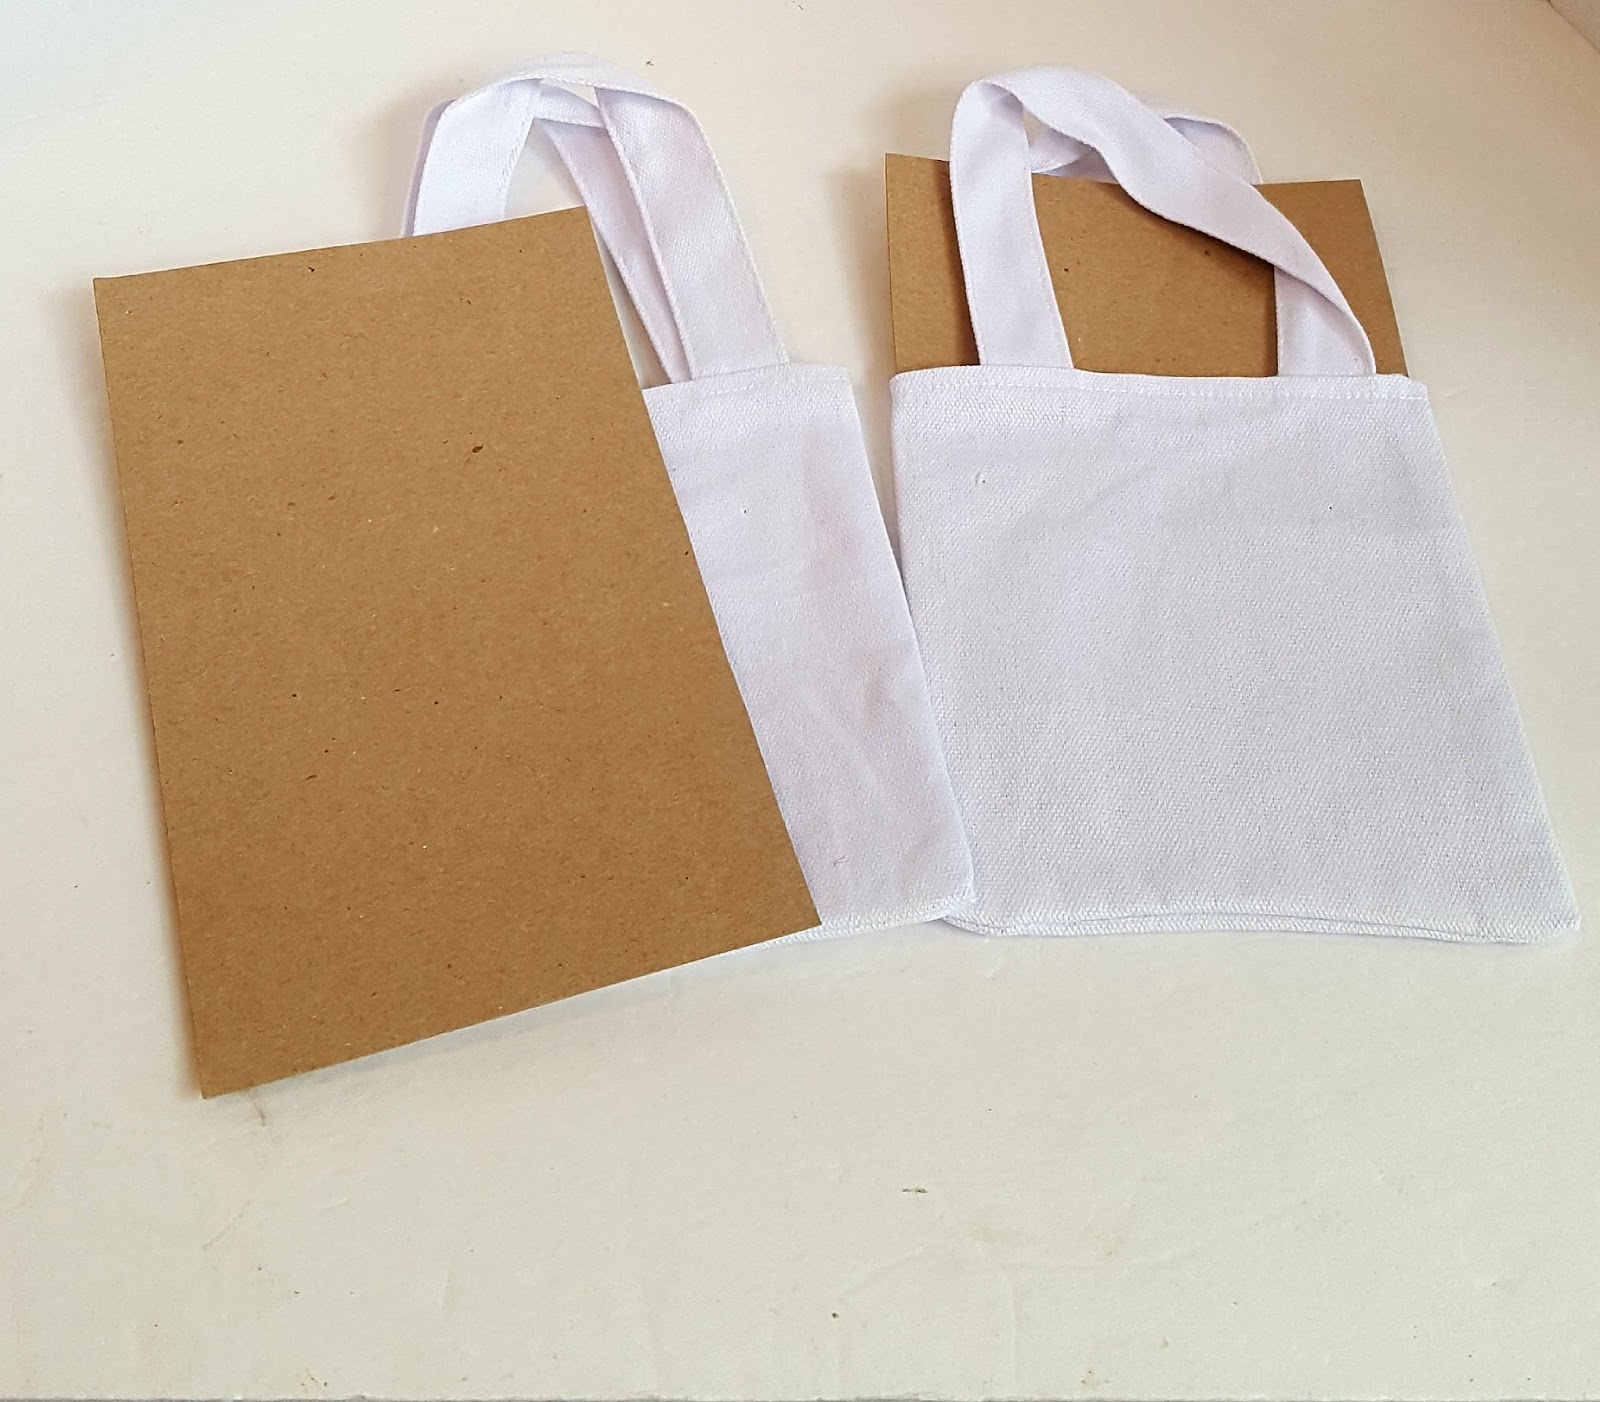
cardboard:  thin; cut to fit inside of bag (5" x 5-1/2")

paper plates or palette

water container

paper towels

iron

pressing cloth

ironing board 

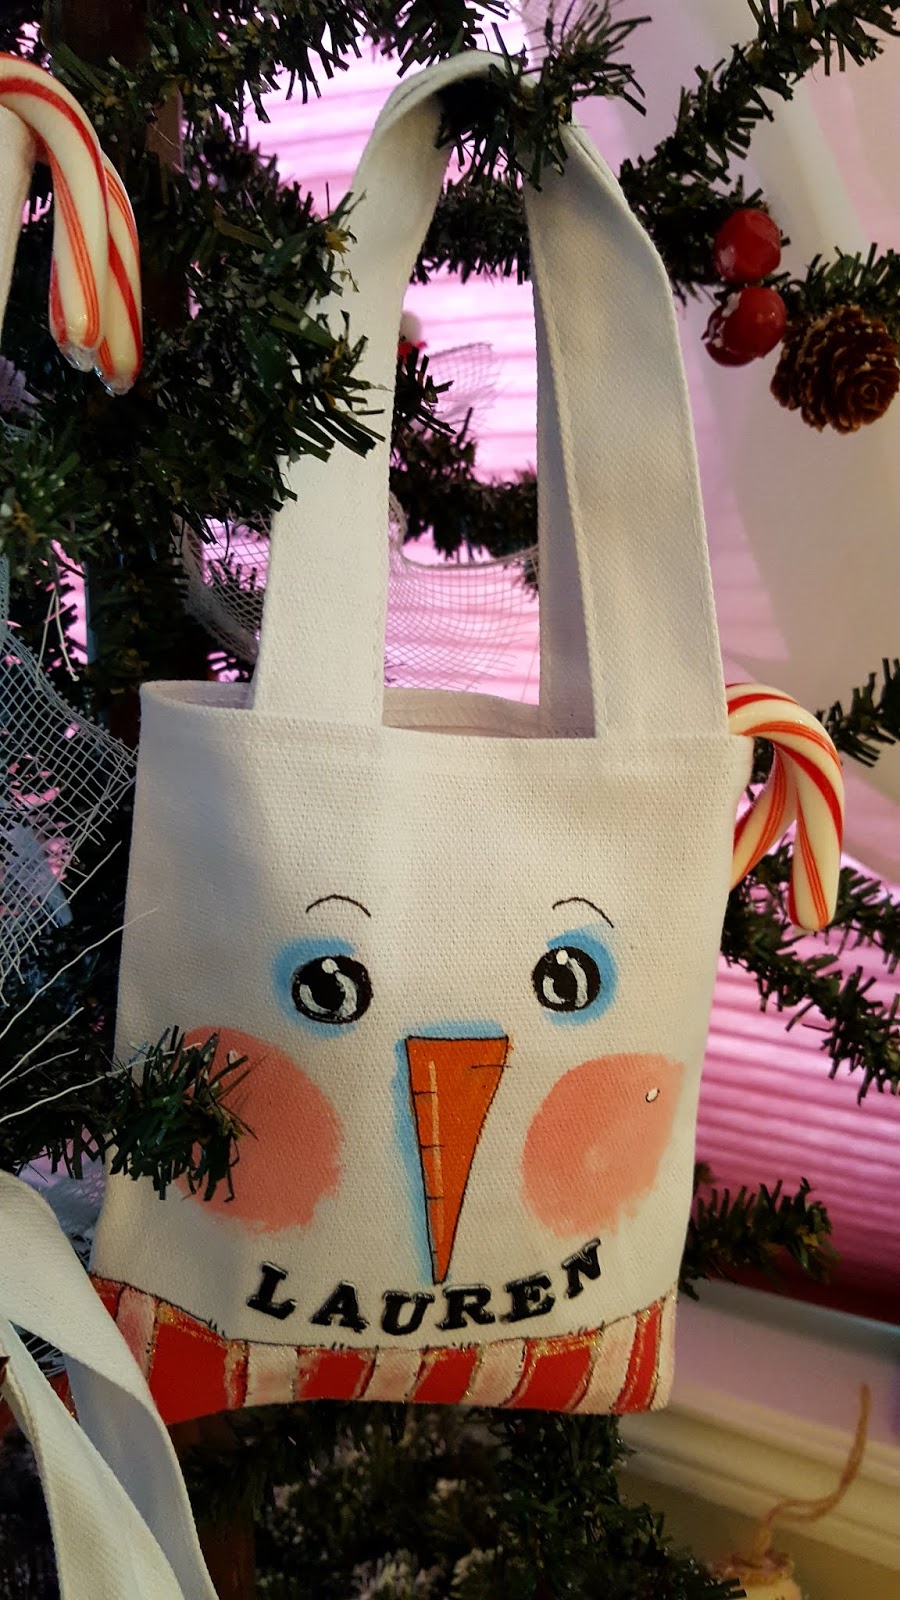
Instructions: 1.  Place the cardboard inside the bag.  Repeat for each bag as you paint. 2.  Lightly pencil mark the placement for the eyes, the carrot nose and mouth.  Leave a 1-1/4" border at the bottom of the bag for painted decoration.  Refer to photos shown.

3.  Paint: eyes black and the carrot nose orange.  Allow to dry.  

4.  Cheeks:  Mix 3 parts water to one part paint.  Use the 1/2" shader and load the brush with the paint. Test on the paint palette before applying to the bag.  Apply to the bag in a circular motion for one cheek.  Fill in bare spots.  Repeat for the other cheek.  Allow to dry.

5.  Shade:  Apply 3 parts water to one part blue paint.  Load the 1/2" brush with water, shake off excess and dip the tip of the brush in the blue paint.  Test on palette for the right consistency.  Repeat and apply around each eye and the nose as shown.  Use a stylus or end of paintbrush handle to apply white dip dots on eyes and cheeks.  

6.  Bottom edge:  Paint the bottom edge of one bag with chosen color.  Allow to dry.  For stripes; use 1/4" flat brush and white paint for the stripes.  For each star:  paint a double X with tip of small round brush.  For polka dots:  Use a pencil eraser for uniform dots.

7.  Detail:  When the paint is completely dry; draw on details using the permanent marker.  This step is optional, though I like the effect.  Use the glitter glue to enhance the stars, stripes and polka dots.

8  Mouth:  The final and most important step!  Personalize each bag with a person's name using the letters to form the snowman's mouth.  Once letters are positioned, carefully press each letter into the canvas fabric using a pressing cloth and hot iron.  Check often to make sure the letters are not moving around.

I used my bags for cocoa kits!  Packets of hot chocolate, marshmallows, chocolate chips and candy canes fill each bag!  They are so cute!  Enjoy!

Designer tip for non-painters:

If you don't like to paint.....there's another option!  Cut nose and eyes from felt then adhere to the bag with fusible web.  A fancy fabric could be used along the bottom of the bag. Apply powder blush with an applicator for the cheeks. This would be a fun children's project.

Look for Joy® iron-on, embroidered letters and appliqués at your local craft store!

Leave a Reply

Your email address will not be published. Required fields are marked *

Recent Projects

Luck O' the Irish DIY Door Hanger

St. Patrick’s Day is just around the corner!  Celebrate the Luck O' the Irish with this colorful door décor that is a fun alternative to a traditional wreath.  You will need: Joy® Iron On Embroidered Letter sheet - Gold Script Kunin Classics™ Felt 9” x 12” Craft Cuts– Red, Orange, Yellow, Apple Green, Lagoon, Royal Blue, Orchid, Pirate Green, Neon Green, Gold and Goldenrod (one each) Kunin Premium™ Felt 9” x 12” Craft Cuts– White and Black (two each). Expo International – Claudia 2” Fan and Lattice Lace.  Ric Rac assorted Rayon – Red, Orange, Yellow, Green, Light Blue, Royal…

Rustic Happy Fall Y'all Pumpkin Sign

HAPPY FALL Y'ALL! I am always on the look out for cute items that can be upcycled to create one of a kind home decor pieces.  This rustic pallet pumpkin was just calling out to me from the Target dollar spot and with the addition of some Joy® iron-on embroidered letters, it quickly becomes a custom keepsake. Select a combination of white Joy® iron-on embroidered letters to spell out your message. To create the apostrophe, I carefully cut the leg from the capital letter Q with a pair of detail scissors. Place the embroidered letters on an old towel in a cardboard box…

Back to School Welcome Banner

Create a "Back to School" welcome banner for your favorite teacher's classroom! Materials: JOY® Embroidered Letters 9” x 12” sheets of Kunin Classicfelt -Black , Gray, Sandstone, Candy Pink and Gold Craft glue Glitter glue Cardstock Ruler, pencils, scissors 4-foot length of ribbon Instructions: Draw a simple pencil pattern (5 pieces as shown) on cardstock and cut out.   Trace and trim each pattern piece seven times on the appropriate color of felt. Glue the pencil pieces together, overlapping as shown and let dry. 4. Peel back liner paper from the JOY letters and attach to the center of each pencil, spelling…

Scrabble-Inspired Tote Bag

I am all about recycling, but most of the tote bags that the grocery stores sell are not very cute or crafty. So in honor of family game night, I created a Scrabble-inspired bag to tote around town! This project makes the perfect quick and easy handmade gift to create for Mom for Mother's Day! Decide what words you want to spell and how they'll connect, making sure the arrangement will fit on the front of your tote bag. Draw a grid of square tiles on graph paper to fit each of your letters. I selected the Joy 1.5" Cooper Style…

Happiness Pillow

Joy® Iron-on embroidered letters in white are great for creating any color you can imagine! You can use dye, markers and even acrylic paint! To Make this Happiness Pillow you'll need: Joy® Embroidered Iron-on Letters - Letter Shop White  Acrylic Paint and Paintbrush NEW Joy® Iron-on Embroidered Flower Appliqué    Canvas Pillow Blank Pillow Form or Polyfil Iron Instructions: 1. Paint each letter to create a rainbow of H-A-P-P-I-N-E-S-S.  Set aside and let dry. 2.  Insert cardboard into pillow blank then paint the pillow with white and light blue paint.  Let dry. 3. Set iron on cotton setting; approx. 350 degrees,…
closearrow-circle-o-downtagtagsminus-circlefacebook-squaretruckpinterest-squareinstagrammenu
0
    0
    Shopping Cart
    Your cart is emptyReturn to Shop