FREE Standard Shipping with $50 Order
|
Minimum Order is $15
10% Discount on $300 Order
|
25% Discount on $600 Order

Slumber party tote bag

Laura Bray
|
July 6, 2017

It's summer vacation and that means it's slumber party season. As a kid, I spent so many summer nights sleeping over at my best friend's house and now my daughter is starting to experience the joy of slumber parties, too. 

I stitched up a cute tote bag to make it easy for her to just throw in her pajamas and favorite bear, and she can head off for a fun night of staying up talking & giggling with her friends.

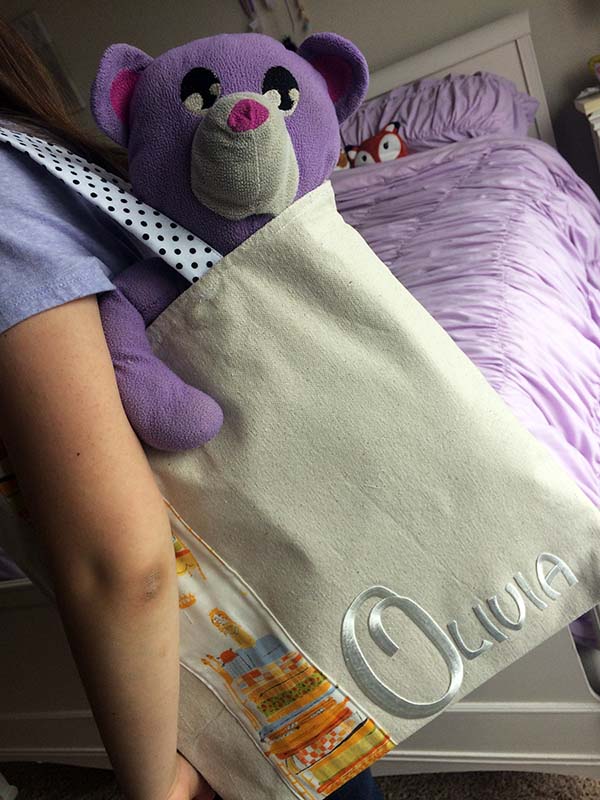
I used Joy Letters to personalize the tote with her name because she frequently forgets things at people's houses. Now there's a better chance her belongings will make it back home.

To sew a slumber party tote bag, I used the "Library Bag" instructions from the book, Sewing Bits and Pieces: 35 Projects Using Fabric Scraps by Sandi Henderson.  I added the monograms and made some size adjustments to suit my needs. You can use any of your favorite tote bag tutorials or patterns to create a similar bag. Supplies:

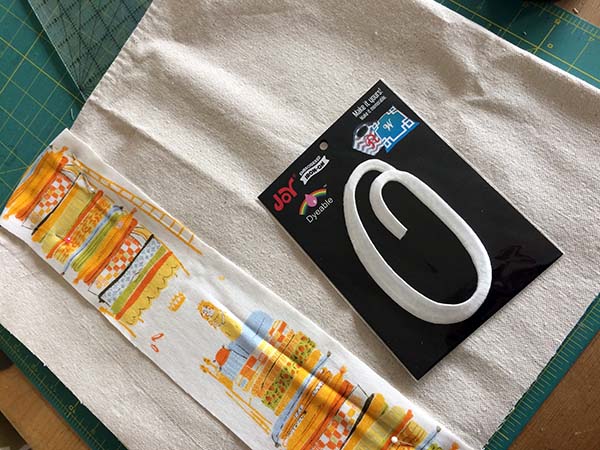
  •  Joy Letters - I used a large monogram for the first letter and smaller letters for the rest of her name
  • 5x17" fabric strip for the front of the tote (mine has a "Princess and the Pea" theme)
  • Two 16x17" pieces of canvas fabric (Designer Tip:  I keep canvas drop cloths from my local hardware store on hand for projects like these. It's super inexpensive and sturdy)
  • Two 16x17" pieces of cotton print for interior 
  • Two 16x17" pieces of Fairfield™ Stabilize™ Interfacing 
  • Two 4x18" pieces of fabric for straps
  • Two 4x18" pieces of interfacing for the straps 
  • Basic sewing supplies

Instructions:

  • Press the raw edges of the 5x17" fabric under. Place the strip, right side up, on one of the canvas fabric pieces, pin and top stitch it into place.
  • Once the fabric is stitched to the front, place the monogram letters on the fabric and iron them on per the package instructions.
  • Iron interfacing onto the backs of the canvas pieces.
  • Fold the top side of the canvas pieces down 1/2" and stitch to finish the top edge.
  • Place canvas pieces together, right sides facing, and stitch around sides and bottom.
  • Turn bag right side out.
  • Iron interfacing onto the back side of the strap fabric. Mark the middle of the strip. Fold the long edges towards the center and press. Fold in half and stitch together.
  • Pin the straps onto the top of the bag, 4" in from each side. Stitch in place.
  • Fold the top side of the interior fabric pieces down 1/2" and stitch to finish the top edge.
  • Place the interior fabrics together, right sides facing, and stitch the sides and bottom together.
  • Turn the interior pieces right side out and put into into the outer bag. Smooth it out and match-up the side seams on both the outer and interior bags. Pin around the top and then stitch around top to hold lining in place. (This is my super tricky/lazy way to give a bag lining!)

Want to make a gusset bottom? Watch the video on my blog for making wine gift bags to see how to create gussets. 

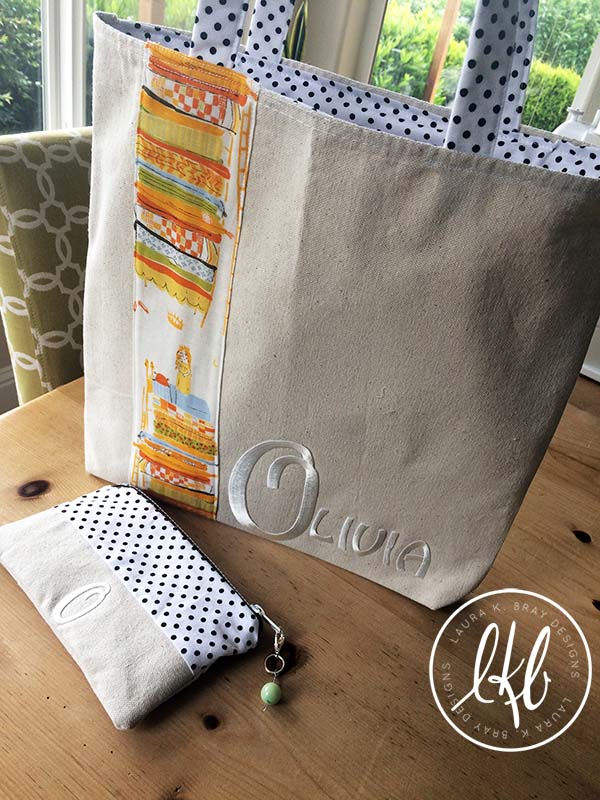
You can find Joy Letters in your local craft and fabric stores. Want to make a matching zipper pouch to go with your "Princess and the Pea" Tote Bag? Visit my blog to get the tutorial. It even has a cute little pea charm on it! This set would make a great birthday gift for your favorite girl!

Leave a Reply

Your email address will not be published. Required fields are marked *

Recent Projects

Luck O' the Irish DIY Door Hanger

St. Patrick’s Day is just around the corner!  Celebrate the Luck O' the Irish with this colorful door décor that is a fun alternative to a traditional wreath.  You will need: Joy® Iron On Embroidered Letter sheet - Gold Script Kunin Classics™ Felt 9” x 12” Craft Cuts– Red, Orange, Yellow, Apple Green, Lagoon, Royal Blue, Orchid, Pirate Green, Neon Green, Gold and Goldenrod (one each) Kunin Premium™ Felt 9” x 12” Craft Cuts– White and Black (two each). Expo International – Claudia 2” Fan and Lattice Lace.  Ric Rac assorted Rayon – Red, Orange, Yellow, Green, Light Blue, Royal…

Rustic Happy Fall Y'all Pumpkin Sign

HAPPY FALL Y'ALL! I am always on the look out for cute items that can be upcycled to create one of a kind home decor pieces.  This rustic pallet pumpkin was just calling out to me from the Target dollar spot and with the addition of some Joy® iron-on embroidered letters, it quickly becomes a custom keepsake. Select a combination of white Joy® iron-on embroidered letters to spell out your message. To create the apostrophe, I carefully cut the leg from the capital letter Q with a pair of detail scissors. Place the embroidered letters on an old towel in a cardboard box…

Back to School Welcome Banner

Create a "Back to School" welcome banner for your favorite teacher's classroom! Materials: JOY® Embroidered Letters 9” x 12” sheets of Kunin Classicfelt -Black , Gray, Sandstone, Candy Pink and Gold Craft glue Glitter glue Cardstock Ruler, pencils, scissors 4-foot length of ribbon Instructions: Draw a simple pencil pattern (5 pieces as shown) on cardstock and cut out.   Trace and trim each pattern piece seven times on the appropriate color of felt. Glue the pencil pieces together, overlapping as shown and let dry. 4. Peel back liner paper from the JOY letters and attach to the center of each pencil, spelling…

Scrabble-Inspired Tote Bag

I am all about recycling, but most of the tote bags that the grocery stores sell are not very cute or crafty. So in honor of family game night, I created a Scrabble-inspired bag to tote around town! This project makes the perfect quick and easy handmade gift to create for Mom for Mother's Day! Decide what words you want to spell and how they'll connect, making sure the arrangement will fit on the front of your tote bag. Draw a grid of square tiles on graph paper to fit each of your letters. I selected the Joy 1.5" Cooper Style…

Happiness Pillow

Joy® Iron-on embroidered letters in white are great for creating any color you can imagine! You can use dye, markers and even acrylic paint! To Make this Happiness Pillow you'll need: Joy® Embroidered Iron-on Letters - Letter Shop White  Acrylic Paint and Paintbrush NEW Joy® Iron-on Embroidered Flower Appliqué    Canvas Pillow Blank Pillow Form or Polyfil Iron Instructions: 1. Paint each letter to create a rainbow of H-A-P-P-I-N-E-S-S.  Set aside and let dry. 2.  Insert cardboard into pillow blank then paint the pillow with white and light blue paint.  Let dry. 3. Set iron on cotton setting; approx. 350 degrees,…
closearrow-circle-o-downtagtagsminus-circlefacebook-squaretruckpinterest-squareinstagrammenu
0
    0
    Shopping Cart
    Your cart is emptyReturn to Shop