FREE Standard Shipping with $50 Order
|
Minimum Order is $15
10% Discount on $300 Order
|
25% Discount on $600 Order

"Home is Where the Heart Is" DIY Pillow

Laura Bray
|
June 12, 2017

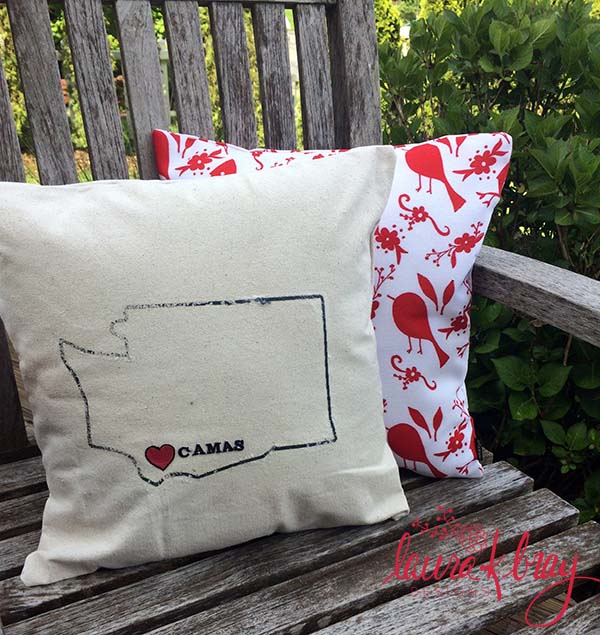
Hello Crafty Friends! I have a sweet pillow idea for you. I moved to the state of Washington late last year and I'm loving it. Everything about this place makes me happy and I'm surprised by how I feel like I've finally "come home" when I never lived here before. Of course, a new house means lots of nest fluffing, so I created this "Home is Where the Heart Is" pillow to not only decorate my new home, but also put my feelings about my new hometown on display. I am using this pillow on my outdoor porch, so I used my favorite fabric - a canvas drop cloth! You can buy huge drop cloths at your local hardware store. They are very inexpensive and very durable, so they are perfect to have on hand for projects like these. If you don't sew, just buy yourself a linen pillow cover and follow the same directions.

Supplies:

  • Joy Classic Monograms - you can find Joy products in your local craft or sewing store.
  • Joy Emojis
  • Canvas drop cloth
  • Inkjet iron-on paper
  • Basic sewing supplies

Instructions:

  1. Using your favorite pillow pattern, cut out the fabric pieces.
  2. Download an outline of your state from the web. There are tons out there, just make sure they are copyright-free!
  3. Cut out your state. Be sure to to cut out INSIDE the state lines too. You can't iron-on the Joy patches over other iron-on images.
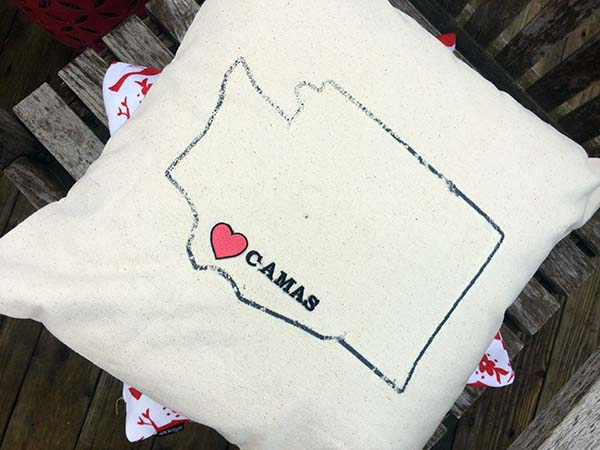
  4. Follow the instructions on the package to iron the image onto the front piece of your pillow. My image didn't transfer completely because I was using drop-cloth material. But there are no mistakes in crafting! I decided I liked the look because I was trying to get an old, farmhouse look and the image transfer "mistake" made that happen!
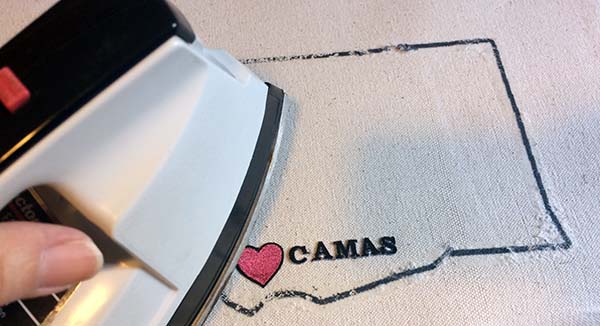
  5. Place a heart on the map where your hometown is located. Iron it on. Again, be careful not to put the iron over the map image or you will have a sticky mess!*

  6. Iron your monogram letters, spelling out your city's name, next to the heart. Be sure to also put a pressing cloth over the letters. This will give you the best results when ironing on Joy products!
  7. Finish sewing up your pillow and enjoy!

*Designer Tips:

  • If you are worried about using an iron-on image, just use a fabric transfer pencil to outline the state image and then embroider it onto your fabric.
  • Whether you use the iron-on technique or a fabric transfer pencil, don't forget to flip the image before you transfer it or your state will transfer facing backwards.

Leave a Reply

Your email address will not be published. Required fields are marked *

Recent Projects

Luck O' the Irish DIY Door Hanger

St. Patrick’s Day is just around the corner!  Celebrate the Luck O' the Irish with this colorful door décor that is a fun alternative to a traditional wreath.  You will need: Joy® Iron On Embroidered Letter sheet - Gold Script Kunin Classics™ Felt 9” x 12” Craft Cuts– Red, Orange, Yellow, Apple Green, Lagoon, Royal Blue, Orchid, Pirate Green, Neon Green, Gold and Goldenrod (one each) Kunin Premium™ Felt 9” x 12” Craft Cuts– White and Black (two each). Expo International – Claudia 2” Fan and Lattice Lace.  Ric Rac assorted Rayon – Red, Orange, Yellow, Green, Light Blue, Royal…

Rustic Happy Fall Y'all Pumpkin Sign

HAPPY FALL Y'ALL! I am always on the look out for cute items that can be upcycled to create one of a kind home decor pieces.  This rustic pallet pumpkin was just calling out to me from the Target dollar spot and with the addition of some Joy® iron-on embroidered letters, it quickly becomes a custom keepsake. Select a combination of white Joy® iron-on embroidered letters to spell out your message. To create the apostrophe, I carefully cut the leg from the capital letter Q with a pair of detail scissors. Place the embroidered letters on an old towel in a cardboard box…

Back to School Welcome Banner

Create a "Back to School" welcome banner for your favorite teacher's classroom! Materials: JOY® Embroidered Letters 9” x 12” sheets of Kunin Classicfelt -Black , Gray, Sandstone, Candy Pink and Gold Craft glue Glitter glue Cardstock Ruler, pencils, scissors 4-foot length of ribbon Instructions: Draw a simple pencil pattern (5 pieces as shown) on cardstock and cut out.   Trace and trim each pattern piece seven times on the appropriate color of felt. Glue the pencil pieces together, overlapping as shown and let dry. 4. Peel back liner paper from the JOY letters and attach to the center of each pencil, spelling…

Scrabble-Inspired Tote Bag

I am all about recycling, but most of the tote bags that the grocery stores sell are not very cute or crafty. So in honor of family game night, I created a Scrabble-inspired bag to tote around town! This project makes the perfect quick and easy handmade gift to create for Mom for Mother's Day! Decide what words you want to spell and how they'll connect, making sure the arrangement will fit on the front of your tote bag. Draw a grid of square tiles on graph paper to fit each of your letters. I selected the Joy 1.5" Cooper Style…

Happiness Pillow

Joy® Iron-on embroidered letters in white are great for creating any color you can imagine! You can use dye, markers and even acrylic paint! To Make this Happiness Pillow you'll need: Joy® Embroidered Iron-on Letters - Letter Shop White  Acrylic Paint and Paintbrush NEW Joy® Iron-on Embroidered Flower Appliqué    Canvas Pillow Blank Pillow Form or Polyfil Iron Instructions: 1. Paint each letter to create a rainbow of H-A-P-P-I-N-E-S-S.  Set aside and let dry. 2.  Insert cardboard into pillow blank then paint the pillow with white and light blue paint.  Let dry. 3. Set iron on cotton setting; approx. 350 degrees,…
closearrow-circle-o-downtagtagsminus-circlefacebook-squaretruckpinterest-squareinstagrammenu
0
    0
    Shopping Cart
    Your cart is emptyReturn to Shop