FREE Standard Shipping with $50 Order
|
Minimum Order is $15
10% Discount on $300 Order
|
25% Discount on $600 Order

DIY Tea Towel

Laura Bray
|
March 15, 2017

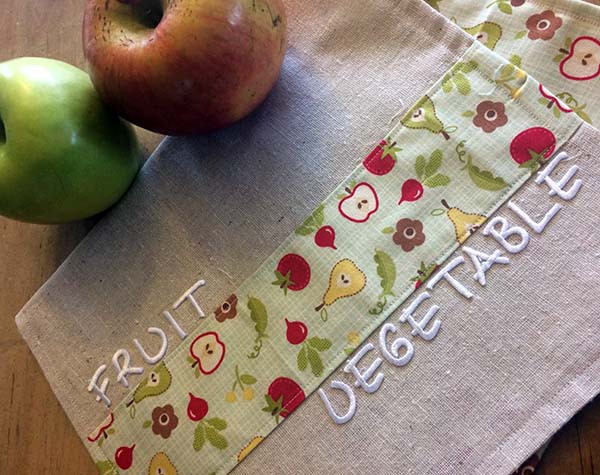
As part of our New Year resolutions (which we are actually sticking to!), we're eating more fruits and vegetables and are being careful about washing them. I've noticed however, that some members of family aren't great about how they dry their fruit after washing it. They'll often grab a towel that's hanging up (that was used to wipe up counters, ICK!), or a paper towel (a better health option, but not great for the environment). So I whipped up a few tea towels that are only to be used for drying our fruit & veggies AND labeled them, because I know how my family operates and that's the only way they will remember which towel to use.

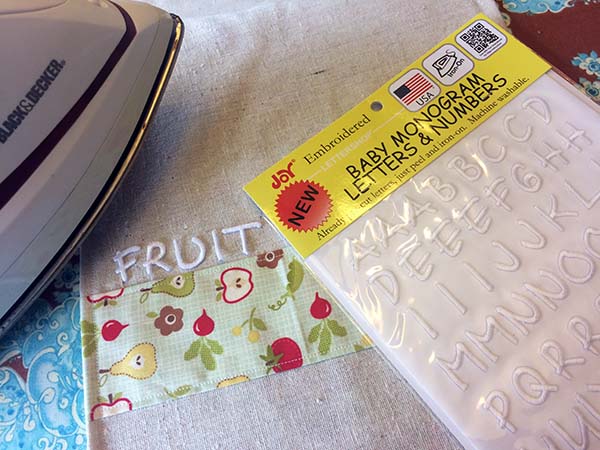
It's so easy (and cute) to label pretty much anything with Joy iron-on embroidered letters. You can make your own tea towel like I did (instructions below), or buy a cute towel from the store. All you have to do is iron on the letters! Here a couple of tips:

  • Place the letters onto the towel, carefully lay a pressing cloth over them, then press your hot iron down. It will take about 20 seconds for the letters to adhere.  
  • Allow the fabric to cool completely before you start moving it around. Remember: "Hot Forgets, Cool Sets." 
  • Flip the project over and press again (over where the letters are on the other side) to ensure that you have fully adhered the letters to your fabric. 

And here's the tea towel sewing tutorial I promised:

Supplies:

    2 pieces of 18" x 10" solid fabric. This will allow for a 1/4" seam allowance. 

     4" x 10" piece of printed fabric

     Basic sewing supplies and a sewing machine

     Joy iron-on embroidered letters

Instructions:

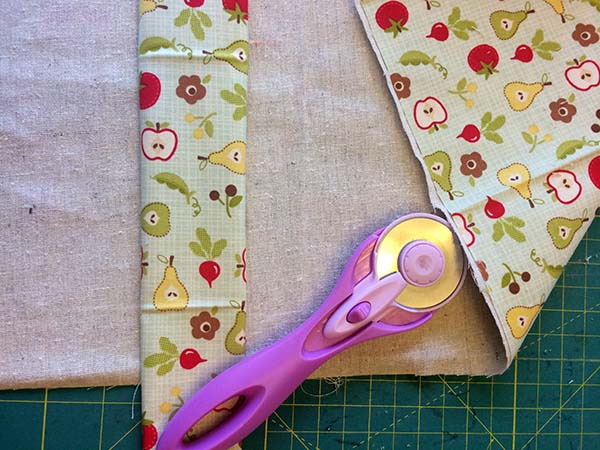
1.   I used a linen fabric for the front and a cute, cotton print for the back. Fold the printed fabric strip lengthwise, folding each long side, one inch toward the middle. Press, then to stitch along the long edges.

2.   Pin the print onto the solid piece of your towel,  3" above the bottom edge. Stitch into place.

3.   Pin the top and back pieces, right sides facing, together. Stitch around the edge, leaving an inch or two at the top of the towel to turn it out.

4.   Turn out the towel and press. Fold the opening in and pin in place.

5.   Top stitch around the edge of the towel, making sure to close the opening.

6.   Place the letters, then follow the ironing instructions above.

I hope you enjoy this tutorial. If you are in the mood to wash a few apples after making your lovely towel,  pop over to Laura's blog for a delicious Sauteed Apple Recipe!

Joy iron-on embroidered letters are available at your local craft store in a variety of fonts, sizes and colors.

Leave a Reply

Your email address will not be published. Required fields are marked *

Recent Projects

Luck O' the Irish DIY Door Hanger

St. Patrick’s Day is just around the corner!  Celebrate the Luck O' the Irish with this colorful door décor that is a fun alternative to a traditional wreath.  You will need: Joy® Iron On Embroidered Letter sheet - Gold Script Kunin Classics™ Felt 9” x 12” Craft Cuts– Red, Orange, Yellow, Apple Green, Lagoon, Royal Blue, Orchid, Pirate Green, Neon Green, Gold and Goldenrod (one each) Kunin Premium™ Felt 9” x 12” Craft Cuts– White and Black (two each). Expo International – Claudia 2” Fan and Lattice Lace.  Ric Rac assorted Rayon – Red, Orange, Yellow, Green, Light Blue, Royal…

Rustic Happy Fall Y'all Pumpkin Sign

HAPPY FALL Y'ALL! I am always on the look out for cute items that can be upcycled to create one of a kind home decor pieces.  This rustic pallet pumpkin was just calling out to me from the Target dollar spot and with the addition of some Joy® iron-on embroidered letters, it quickly becomes a custom keepsake. Select a combination of white Joy® iron-on embroidered letters to spell out your message. To create the apostrophe, I carefully cut the leg from the capital letter Q with a pair of detail scissors. Place the embroidered letters on an old towel in a cardboard box…

Back to School Welcome Banner

Create a "Back to School" welcome banner for your favorite teacher's classroom! Materials: JOY® Embroidered Letters 9” x 12” sheets of Kunin Classicfelt -Black , Gray, Sandstone, Candy Pink and Gold Craft glue Glitter glue Cardstock Ruler, pencils, scissors 4-foot length of ribbon Instructions: Draw a simple pencil pattern (5 pieces as shown) on cardstock and cut out.   Trace and trim each pattern piece seven times on the appropriate color of felt. Glue the pencil pieces together, overlapping as shown and let dry. 4. Peel back liner paper from the JOY letters and attach to the center of each pencil, spelling…

Scrabble-Inspired Tote Bag

I am all about recycling, but most of the tote bags that the grocery stores sell are not very cute or crafty. So in honor of family game night, I created a Scrabble-inspired bag to tote around town! This project makes the perfect quick and easy handmade gift to create for Mom for Mother's Day! Decide what words you want to spell and how they'll connect, making sure the arrangement will fit on the front of your tote bag. Draw a grid of square tiles on graph paper to fit each of your letters. I selected the Joy 1.5" Cooper Style…

Happiness Pillow

Joy® Iron-on embroidered letters in white are great for creating any color you can imagine! You can use dye, markers and even acrylic paint! To Make this Happiness Pillow you'll need: Joy® Embroidered Iron-on Letters - Letter Shop White  Acrylic Paint and Paintbrush NEW Joy® Iron-on Embroidered Flower Appliqué    Canvas Pillow Blank Pillow Form or Polyfil Iron Instructions: 1. Paint each letter to create a rainbow of H-A-P-P-I-N-E-S-S.  Set aside and let dry. 2.  Insert cardboard into pillow blank then paint the pillow with white and light blue paint.  Let dry. 3. Set iron on cotton setting; approx. 350 degrees,…
closearrow-circle-o-downtagtagsminus-circlefacebook-squaretruckpinterest-squareinstagrammenu
0
    0
    Shopping Cart
    Your cart is emptyReturn to Shop