FREE Standard Shipping with $50 Order
|
Minimum Order is $15
10% Discount on $300 Order
|
25% Discount on $600 Order

Spooky Cell Phone Pouch

Michelle Frae Cummings
|
October 9, 2016

Even though my cell phone is in a protective case, I thought it would be fun to make up a decorative pouch for it! Now I can easily find it in my purse and it's wicked cool to show off! I just love Halloween, don't you? This stylish cell phone pouch can also be used to hold credit cards, money or keys for a quick jaunt into the grocery store. Materials:
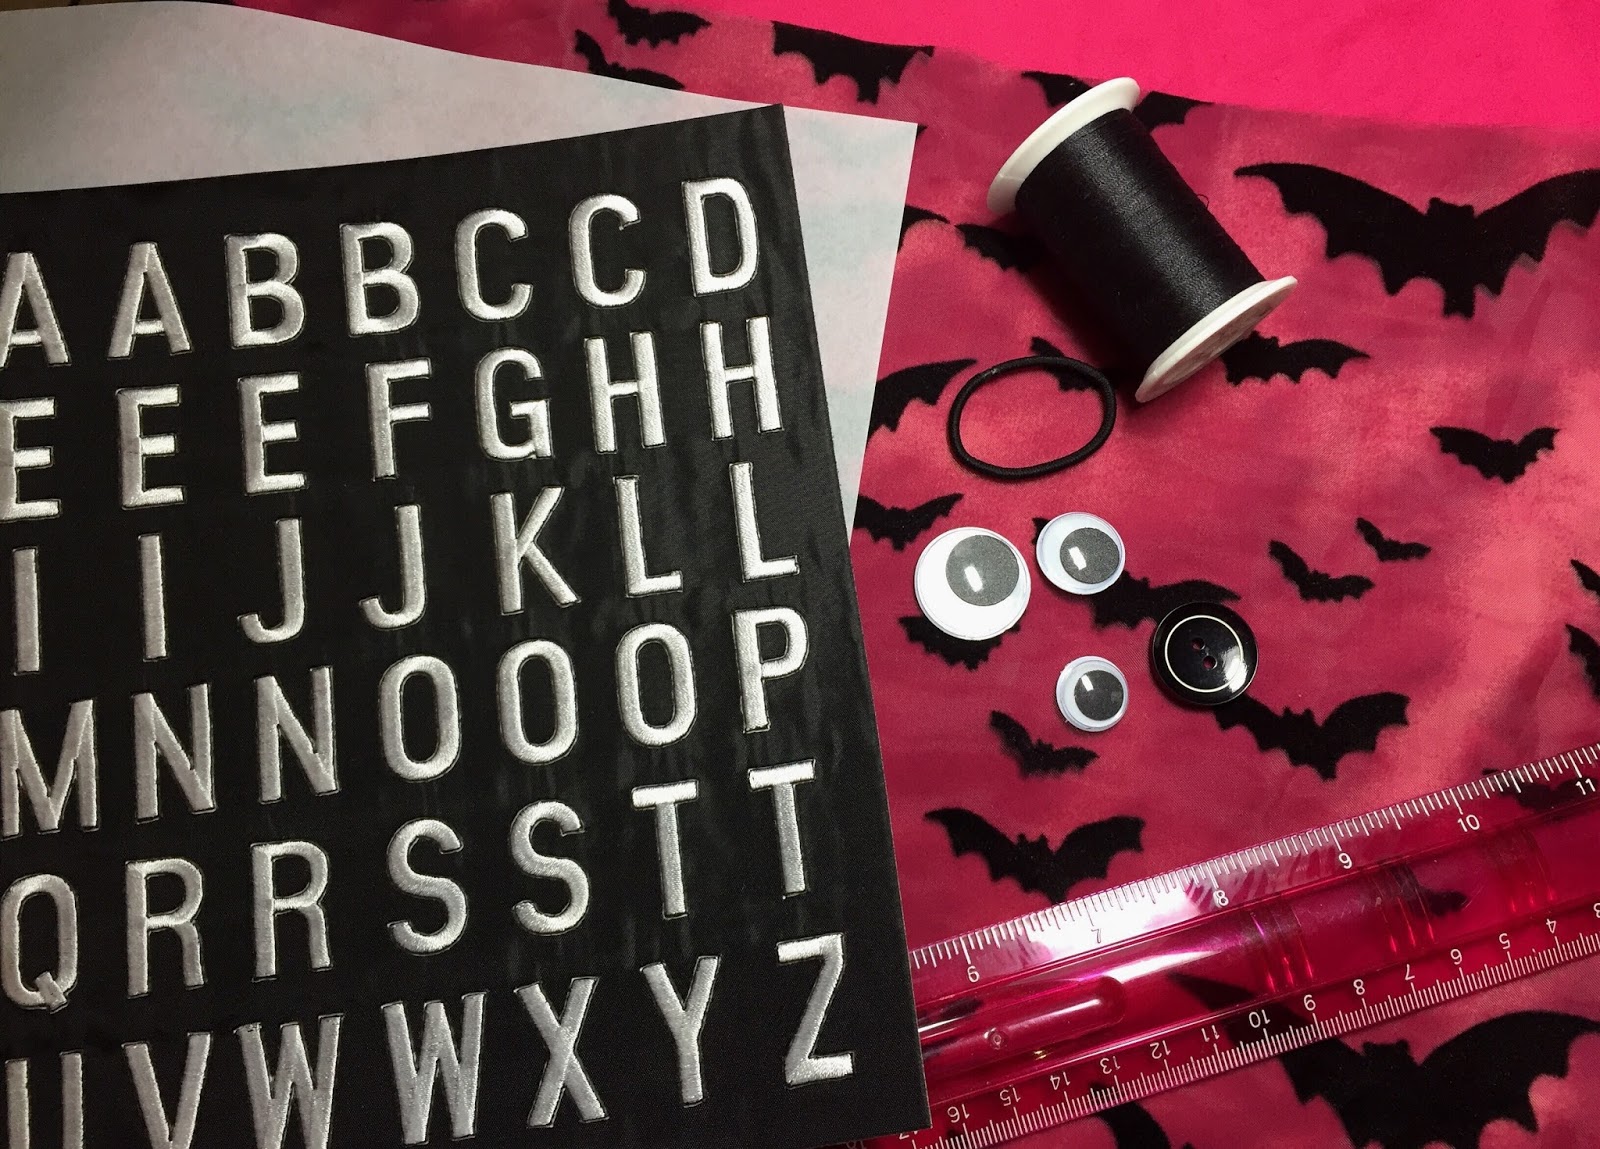
  • JOY letters
  • Sewing machine
  • Pins, threads, needle 
  • Translucent or tracing paper 
  • 3 google eyes
  • Button and colored elastic (I used hair bands)
  • Ruler, pen and sewing scissors
  • Fabric of choice and micro fleece for the lining
  • Strong, clear-dry glue

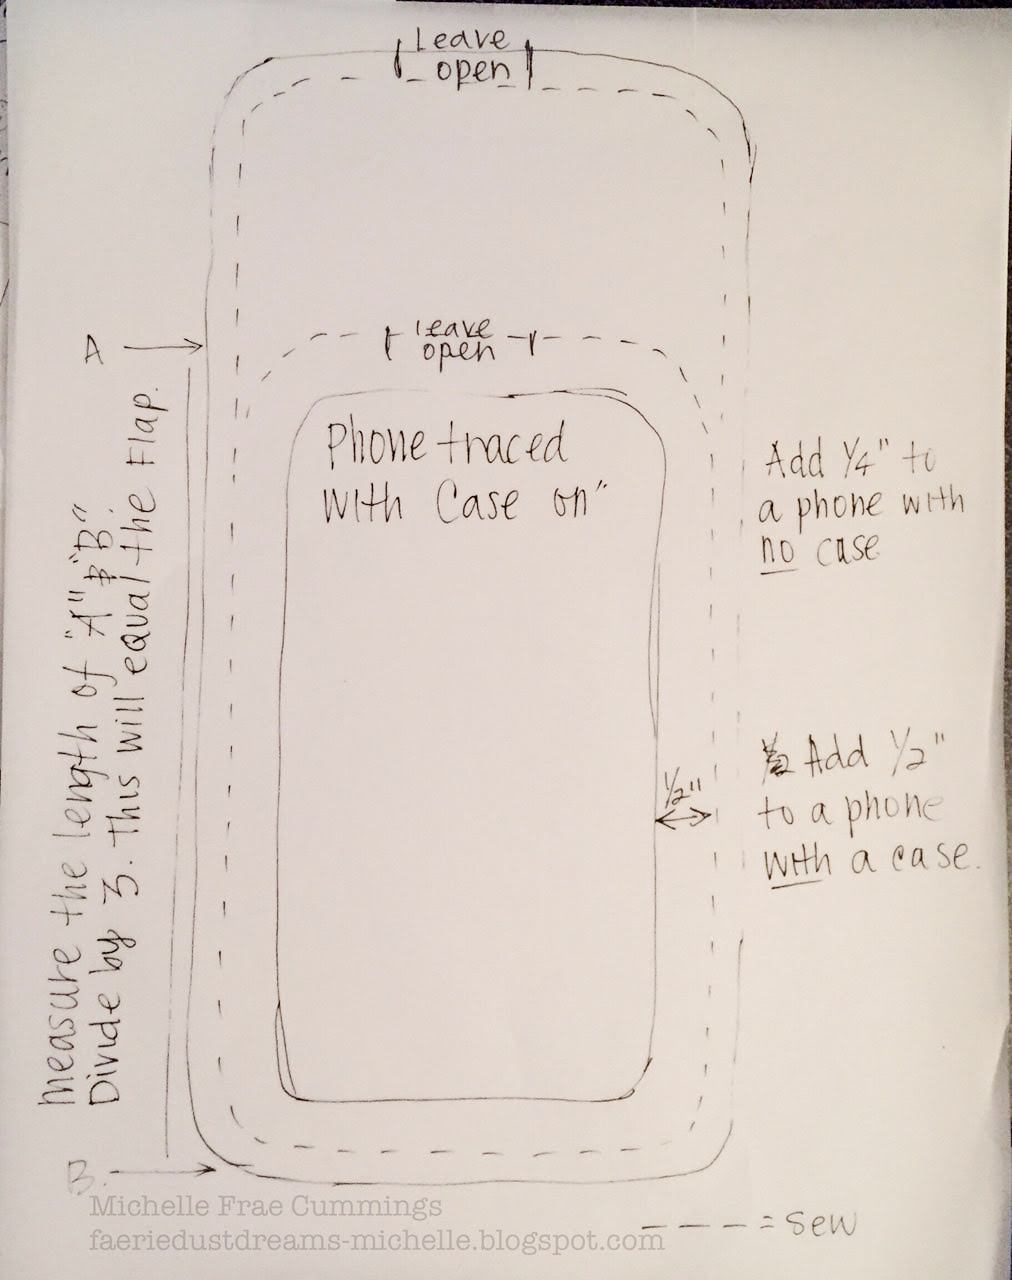
Here's what you'll need to do: Trace your phone onto the translucent paper. Use your ruler to measure a dotted border all around the trace (1/4" for a phone with no case or 1/2" for a phone with a case) for a seam allowance. Measure the length of your trace, then divide this by 3. Your result will tell you how much fabric to add for the flap of the pouch. Add your seam allowance and mark a 1" slot to leave open at top of pattern as shown.

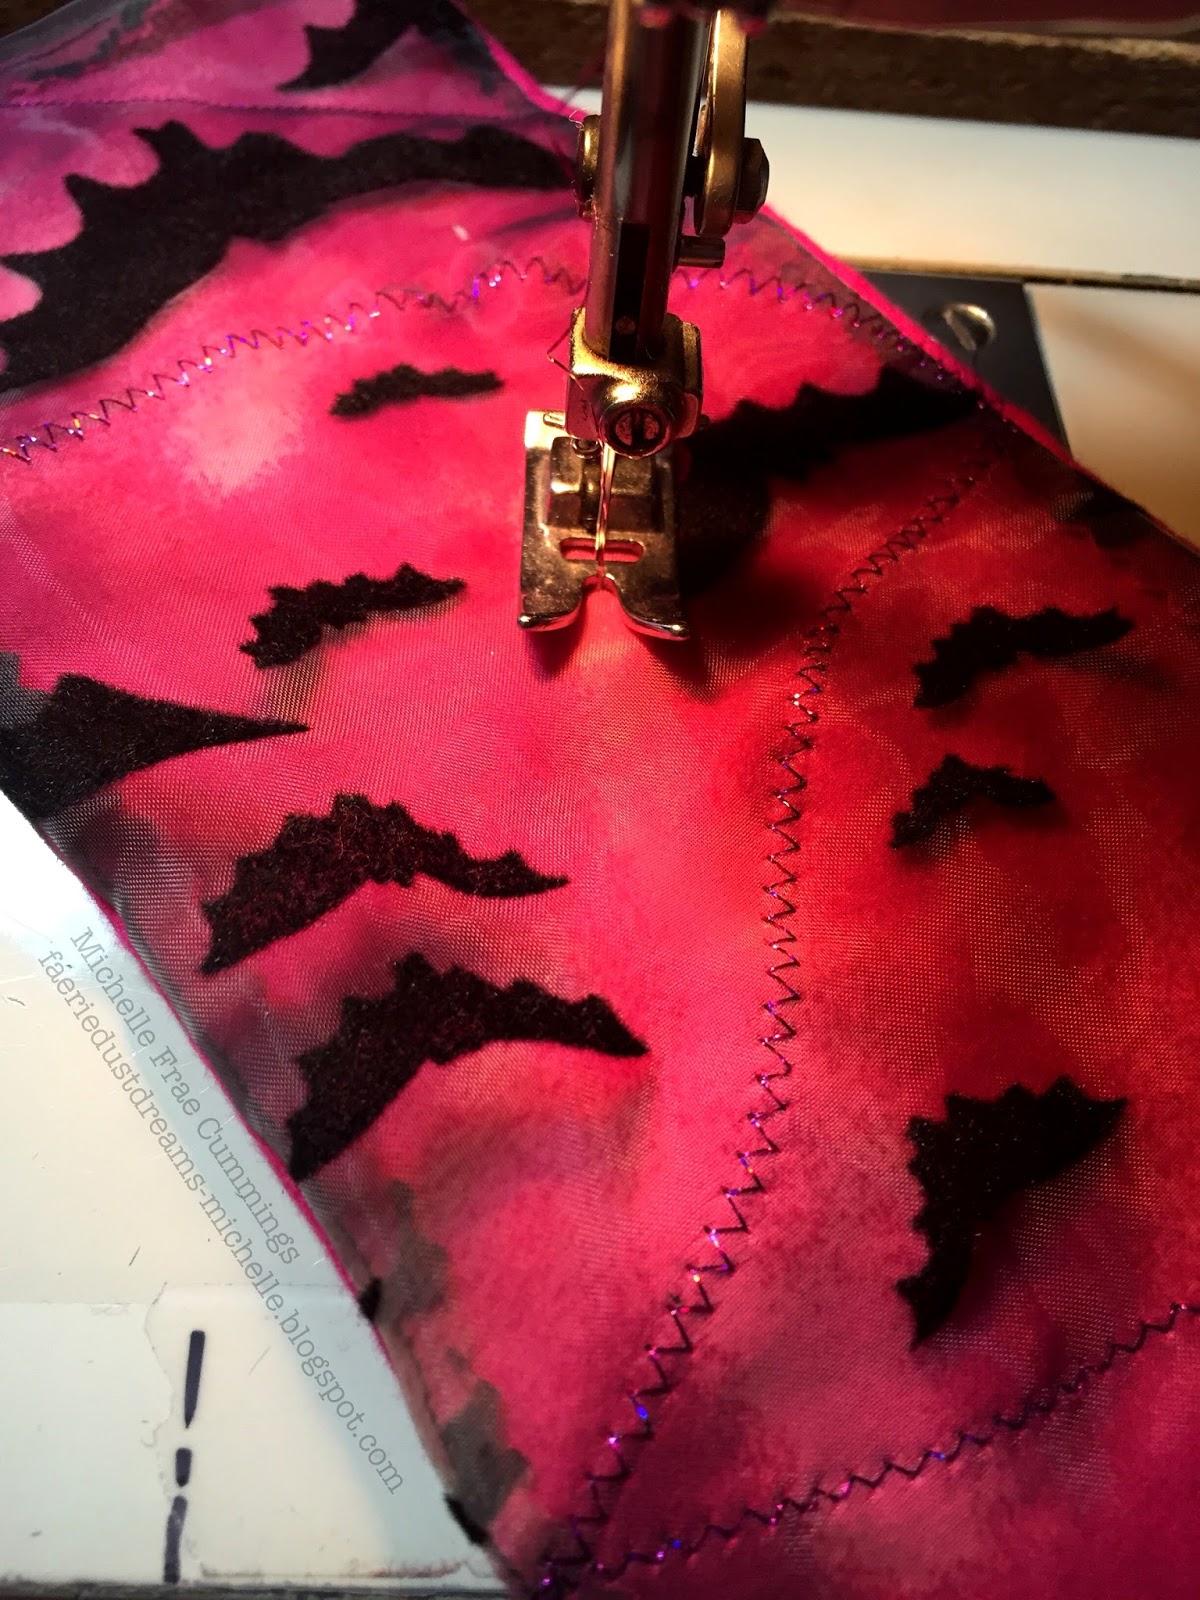
Make two copies of your pattern and cut out both - one for the total length plus flap, the other for just the front. Lay the right side of the fabric on top of the fleece and pin your patterns in place. Sew along the dotted lines with a small stitch.

Carefully remove the paper and trim edges with pinking shears.

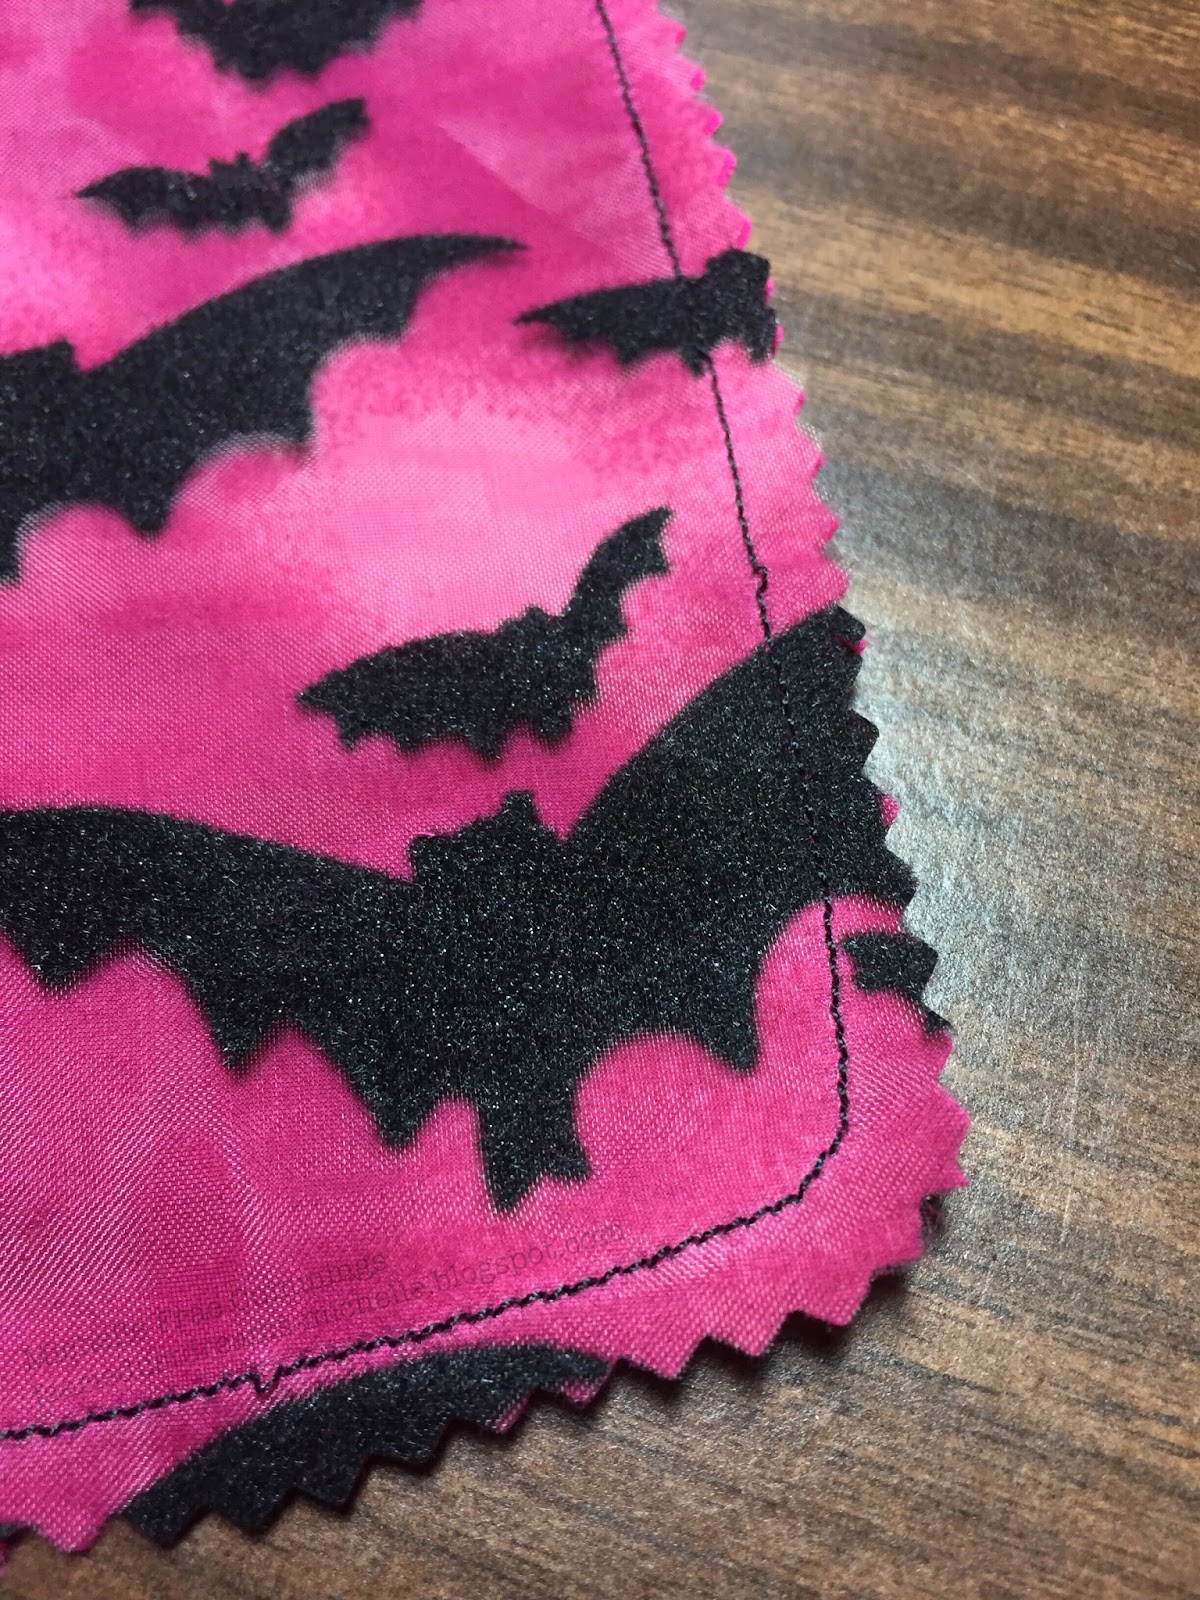
Use the slot openings to turn each piece inside out. Iron flat if desired. For the flap closure, pin the hair band just inside the slot of the longer piece, leaving a loop of it exposed and stitch the slot closed. Add any decorative stitching if desired on both pieces.

Pin your two pieces together and insert phone for fit. Pull down the flap to mark where the button should go for the loop closure and stitch the button in place. Stitch bottom and sides of the two pieces together to finish the pouch.

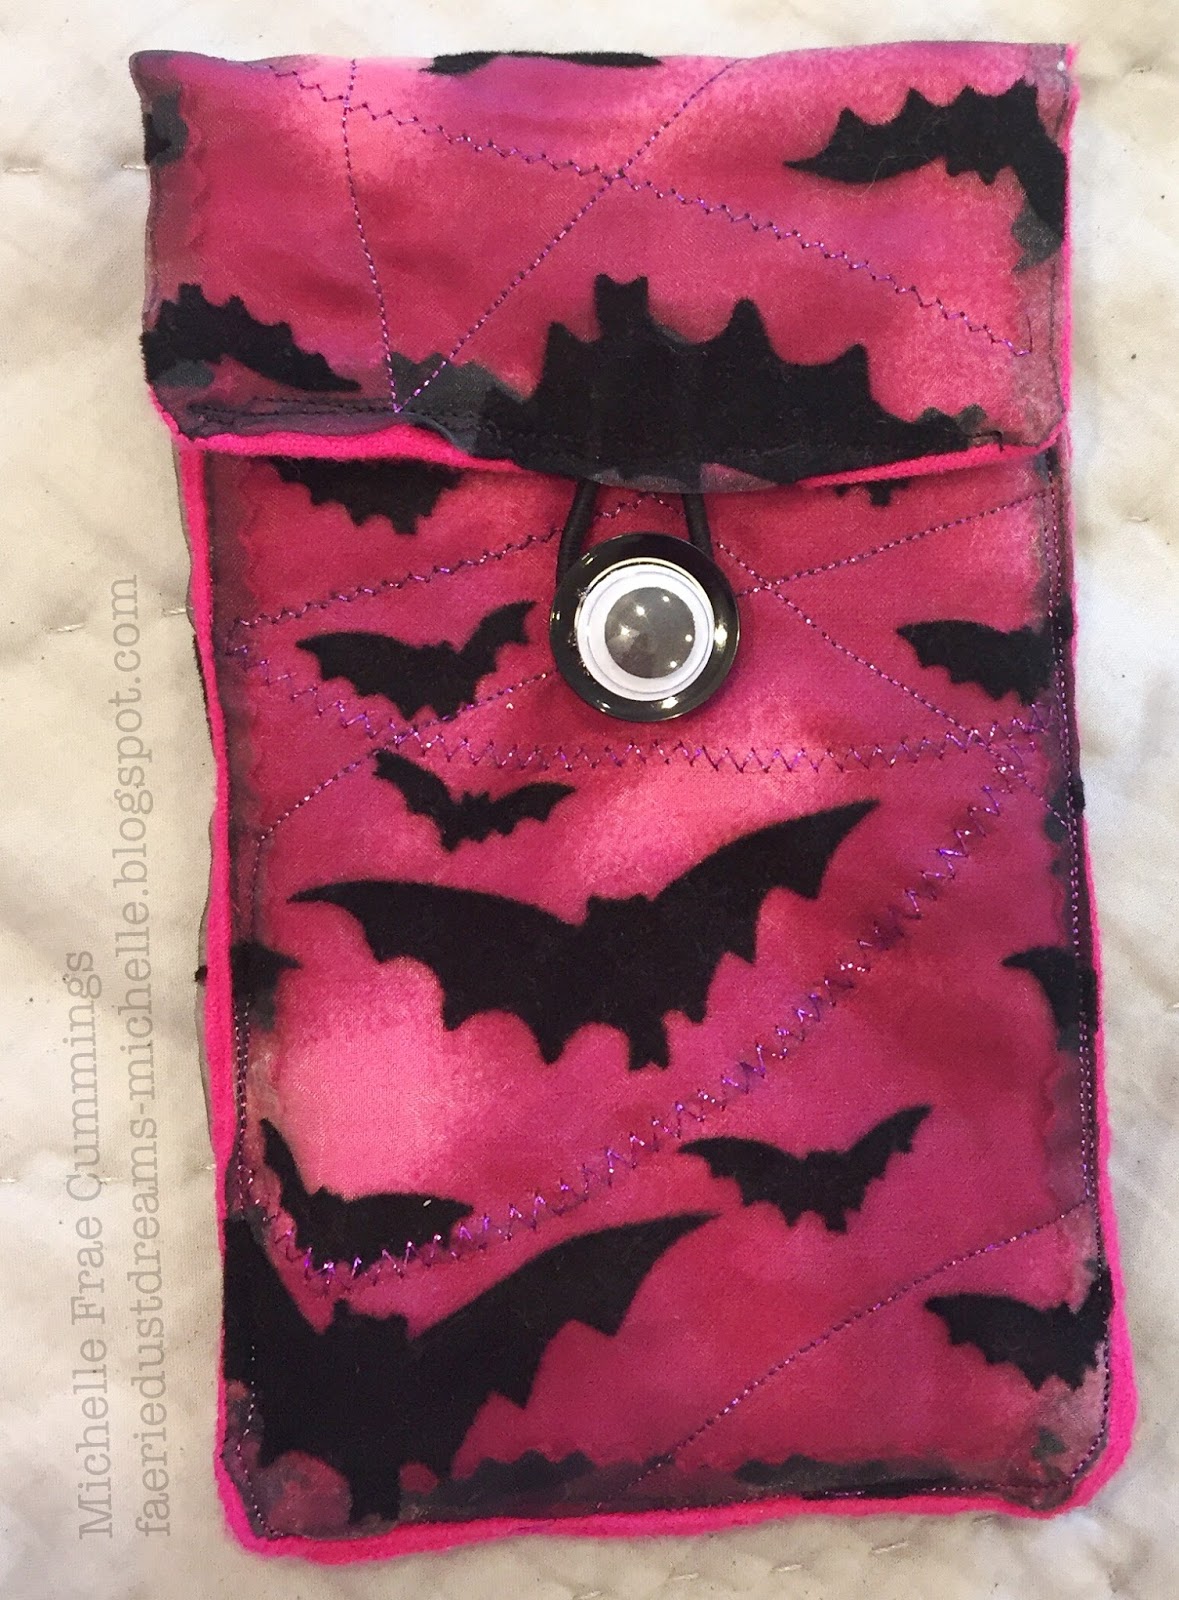
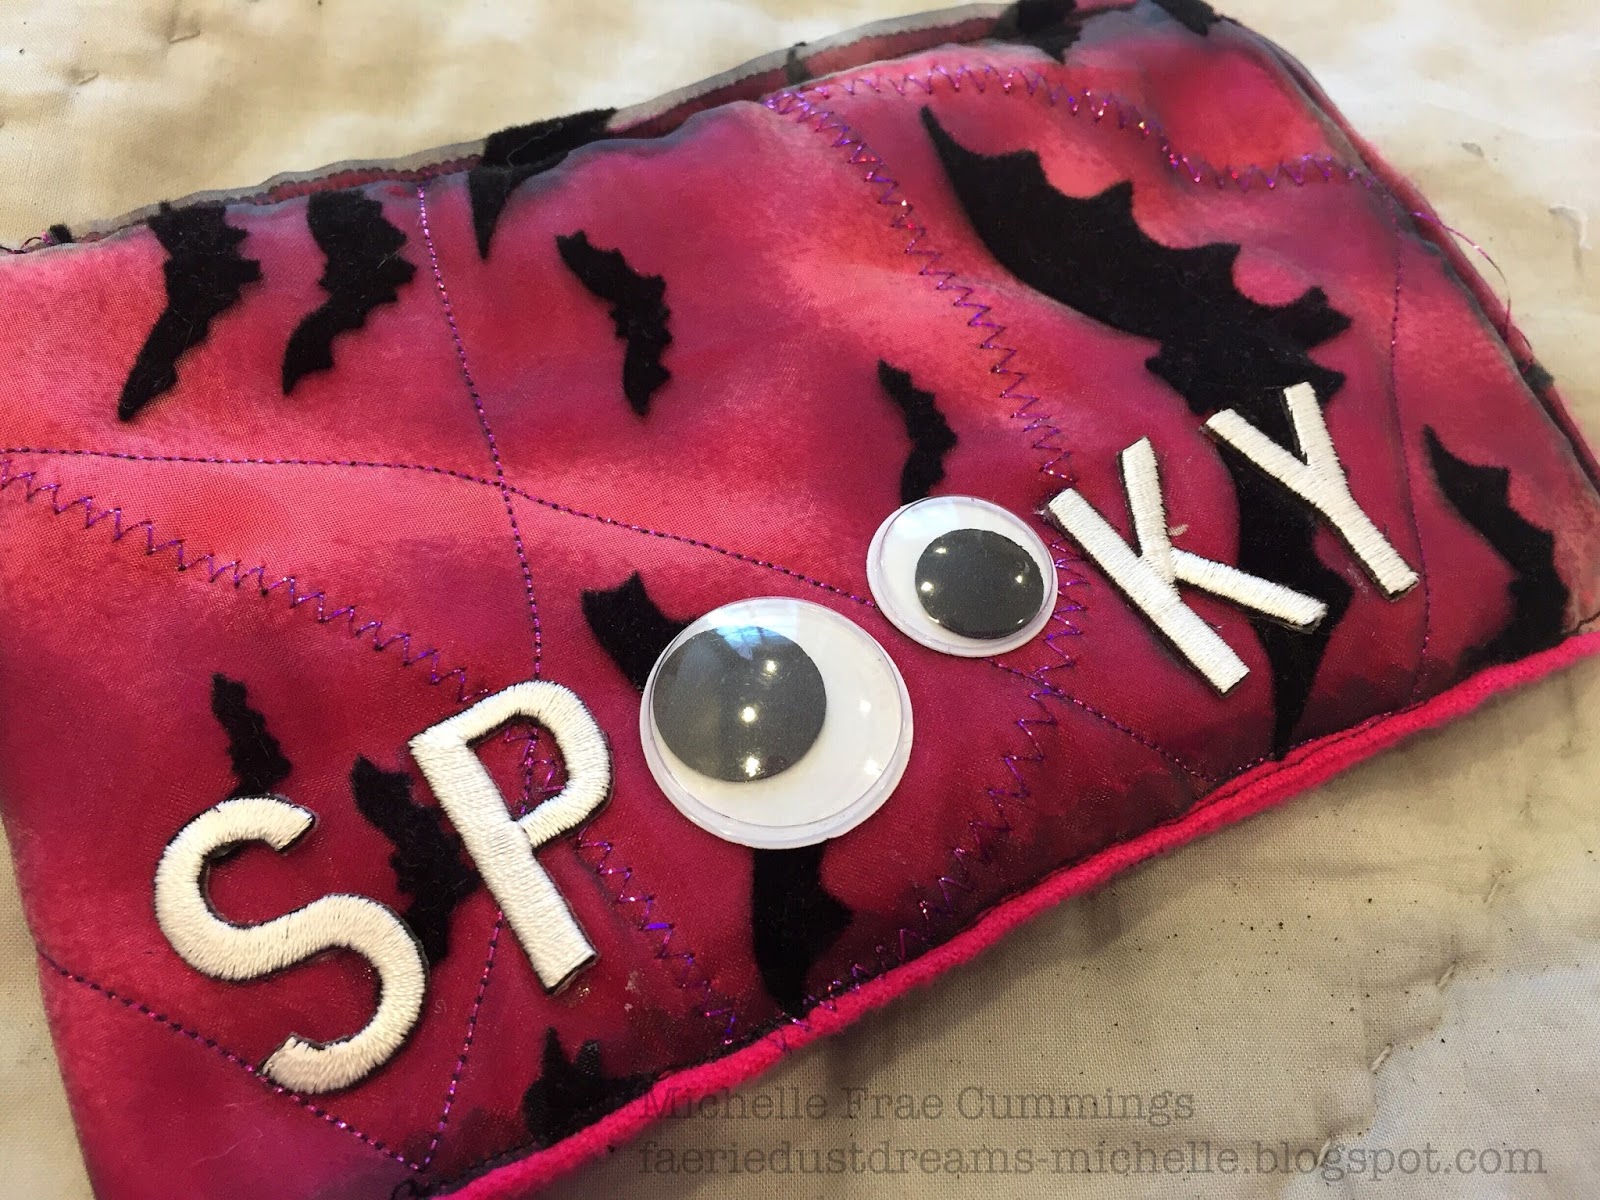
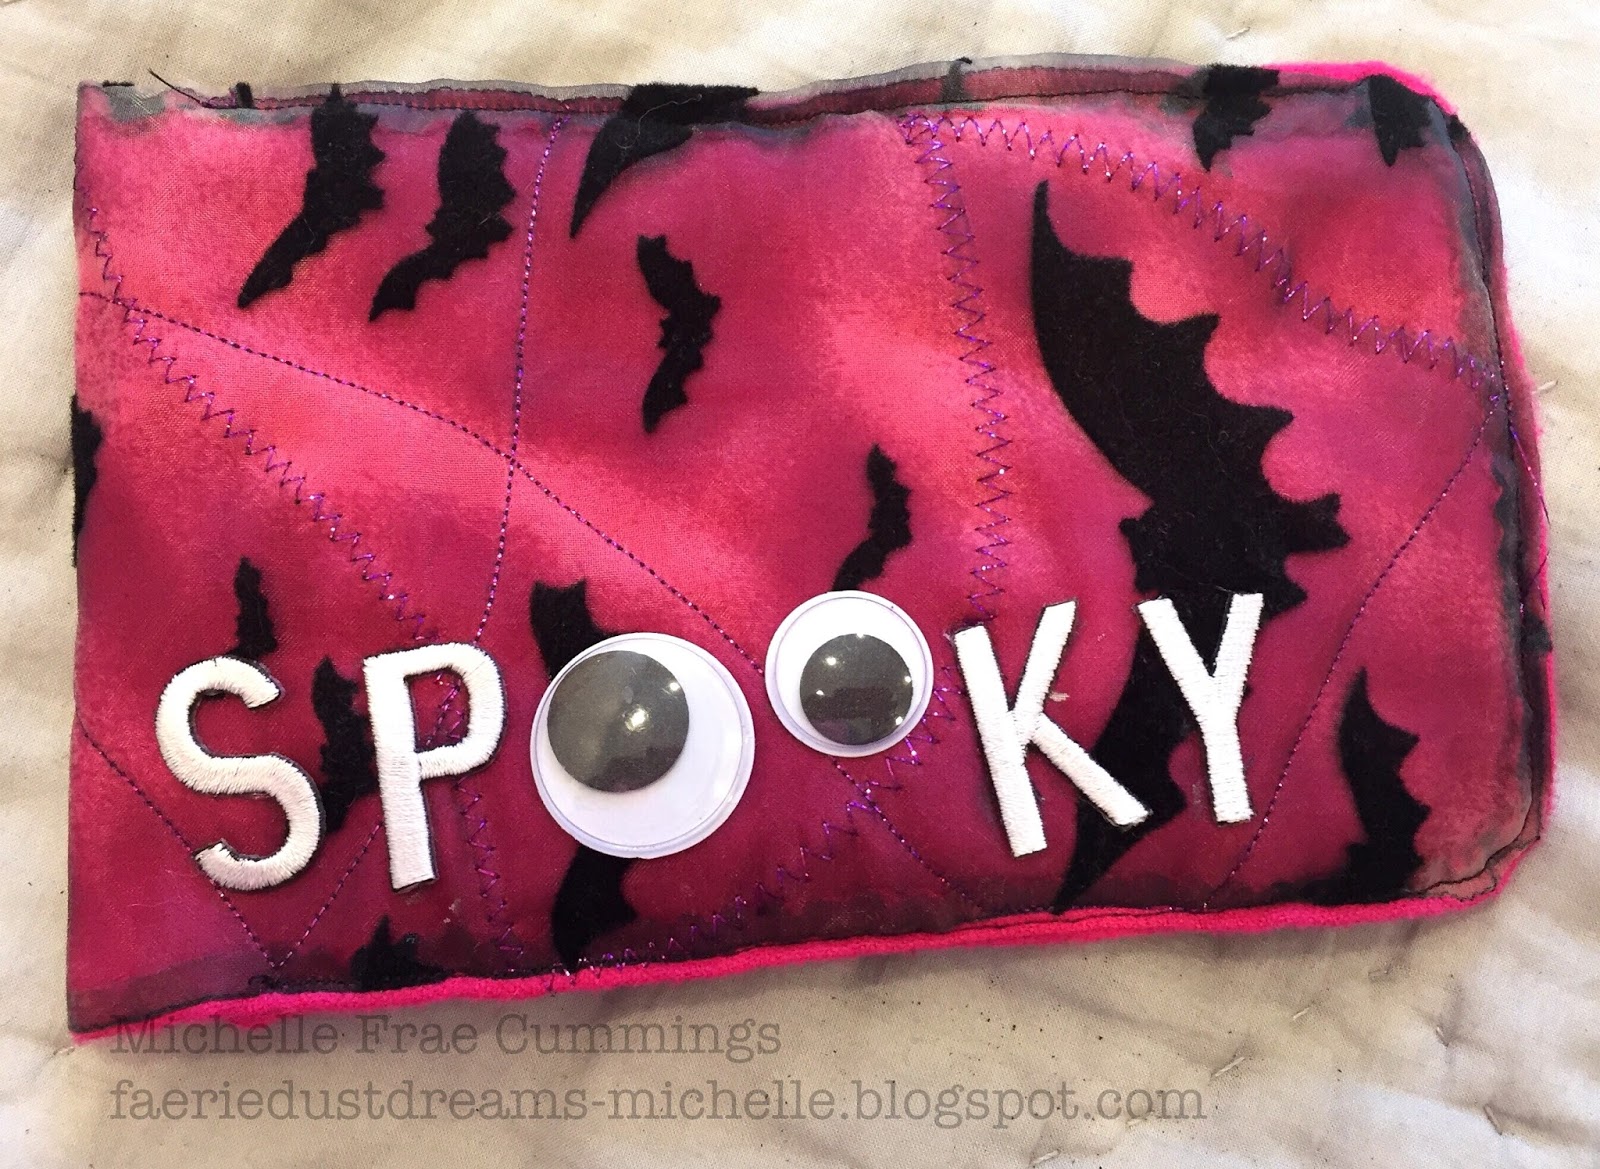
Glue a google eye to the button and glue the letters and extra google eyes to the front of the pouch. Allow to dry (I placed books on top to keep things flat until the glue was set). My fabric was organza, so I did not iron on the Joy letters like I would have if I was using cotton.

Leave a Reply

Your email address will not be published. Required fields are marked *

Recent Projects

Luck O' the Irish DIY Door Hanger

St. Patrick’s Day is just around the corner!  Celebrate the Luck O' the Irish with this colorful door décor that is a fun alternative to a traditional wreath.  You will need: Joy® Iron On Embroidered Letter sheet - Gold Script Kunin Classics™ Felt 9” x 12” Craft Cuts– Red, Orange, Yellow, Apple Green, Lagoon, Royal Blue, Orchid, Pirate Green, Neon Green, Gold and Goldenrod (one each) Kunin Premium™ Felt 9” x 12” Craft Cuts– White and Black (two each). Expo International – Claudia 2” Fan and Lattice Lace.  Ric Rac assorted Rayon – Red, Orange, Yellow, Green, Light Blue, Royal…

Rustic Happy Fall Y'all Pumpkin Sign

HAPPY FALL Y'ALL! I am always on the look out for cute items that can be upcycled to create one of a kind home decor pieces.  This rustic pallet pumpkin was just calling out to me from the Target dollar spot and with the addition of some Joy® iron-on embroidered letters, it quickly becomes a custom keepsake. Select a combination of white Joy® iron-on embroidered letters to spell out your message. To create the apostrophe, I carefully cut the leg from the capital letter Q with a pair of detail scissors. Place the embroidered letters on an old towel in a cardboard box…

Back to School Welcome Banner

Create a "Back to School" welcome banner for your favorite teacher's classroom! Materials: JOY® Embroidered Letters 9” x 12” sheets of Kunin Classicfelt -Black , Gray, Sandstone, Candy Pink and Gold Craft glue Glitter glue Cardstock Ruler, pencils, scissors 4-foot length of ribbon Instructions: Draw a simple pencil pattern (5 pieces as shown) on cardstock and cut out.   Trace and trim each pattern piece seven times on the appropriate color of felt. Glue the pencil pieces together, overlapping as shown and let dry. 4. Peel back liner paper from the JOY letters and attach to the center of each pencil, spelling…

Scrabble-Inspired Tote Bag

I am all about recycling, but most of the tote bags that the grocery stores sell are not very cute or crafty. So in honor of family game night, I created a Scrabble-inspired bag to tote around town! This project makes the perfect quick and easy handmade gift to create for Mom for Mother's Day! Decide what words you want to spell and how they'll connect, making sure the arrangement will fit on the front of your tote bag. Draw a grid of square tiles on graph paper to fit each of your letters. I selected the Joy 1.5" Cooper Style…

Happiness Pillow

Joy® Iron-on embroidered letters in white are great for creating any color you can imagine! You can use dye, markers and even acrylic paint! To Make this Happiness Pillow you'll need: Joy® Embroidered Iron-on Letters - Letter Shop White  Acrylic Paint and Paintbrush NEW Joy® Iron-on Embroidered Flower Appliqué    Canvas Pillow Blank Pillow Form or Polyfil Iron Instructions: 1. Paint each letter to create a rainbow of H-A-P-P-I-N-E-S-S.  Set aside and let dry. 2.  Insert cardboard into pillow blank then paint the pillow with white and light blue paint.  Let dry. 3. Set iron on cotton setting; approx. 350 degrees,…
closearrow-circle-o-downtagtagsminus-circlefacebook-squaretruckpinterest-squareinstagrammenu
0
    0
    Shopping Cart
    Your cart is emptyReturn to Shop