FREE Standard Shipping with $50 Order
|
Minimum Order is $15
10% Discount on $300 Order
|
25% Discount on $600 Order

The JOY of a wedding!

PriMarilynLy Paper
|
February 27, 2016

wedding table markers marilyn gossett 
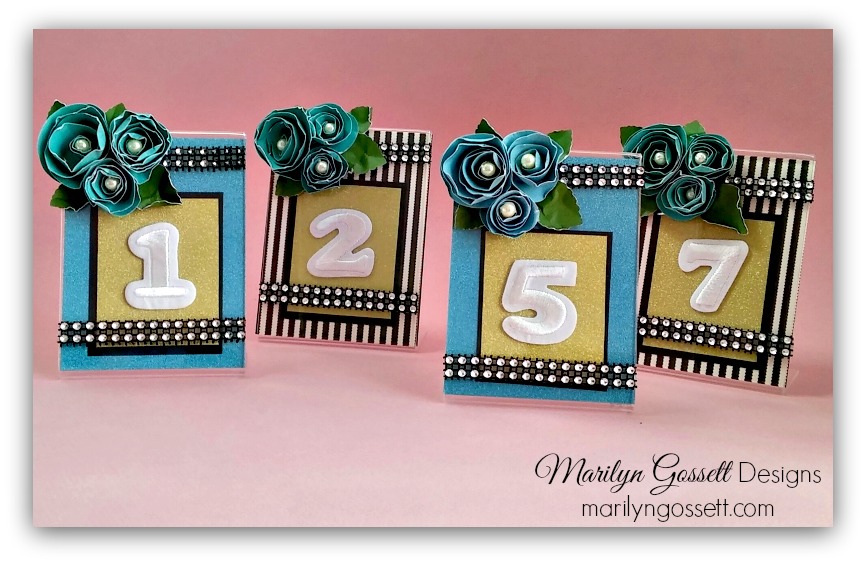
We have a wedding coming this summer!I get to be the DIY wedding decorator and I am so excited. My daughter has chosen her colors and now I get to put my hand to the task of creating table decorations and more! We have lots to do and this is just the beginning...you'll see more of my wedding projects next month! For the table markers I put together the following supplies: Joy embroidered numbers Cardstock -  teal, black, black/ivory stripes, gold glitter, turquoise glitter 3" x 4" acrylic signholders (I used Deflecto) Rhinestone trim Pearl embellishments Adhesives, scissors, paper trimmer, glue gun
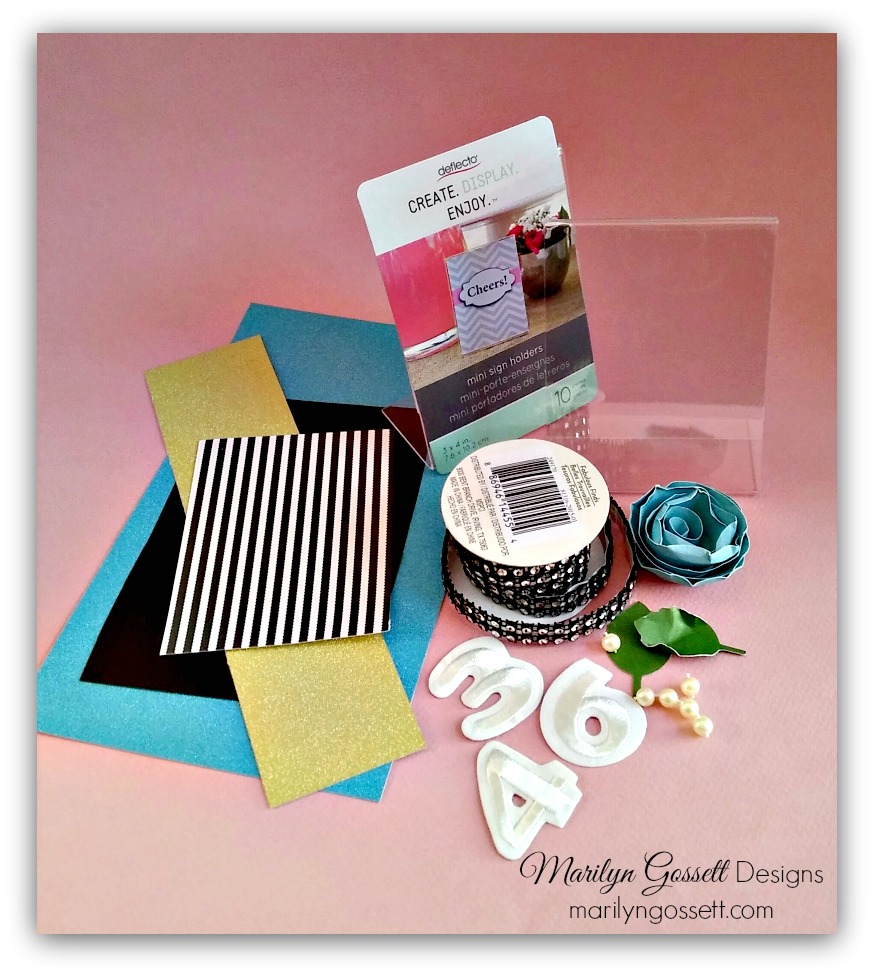
Instructions:

To make one of the flowers, cut the teal cardstock (12"x12") into nine equal squares. Cut off the four corners of one square making it round - it doesn't have to be perfect. Cut it into a spiral shape, about 3/8" thick. Leave a little circle in the middle. Roll the spiral into the form of a rose. Adhere the circle on the bottom to the rest of the flower to secure. A glue gun works best for this step, especially if you have multiple flowers to secure.  I use my fingers and thumbnail to distress the edges of the rose.  Repeat for each flower.  Cut smaller squares of cardstock for smaller roses.

Cut out leaves by hand or with a die-cutting machine. If you cut out a heart and cut it in two; you can more easily shape each half into a leaf. Add the leaves after gluing the flowers to the frame.

To frame each table number, cut mattes from the cardstock as follows:

Stripe/teal:  3" x 4"

Gold:  2" x 2-1/2"

Black:  2-1/8" x 2-3/8"

Center and adhere the gold paper to the slightly larger black paper.  Center and adhere to the background paper 1/2" up from the bottom edge. Insert into the frame.

Embellish the outside of the frame with the faux rhinestone trim, flowers and leaves. Glue one pearl into the center of each rose.

Remove the backing from each number; center and adhere to each frame as shown in the photo given.

Leave a Reply

Your email address will not be published. Required fields are marked *

Recent Projects

Luck O' the Irish DIY Door Hanger

St. Patrick’s Day is just around the corner!  Celebrate the Luck O' the Irish with this colorful door décor that is a fun alternative to a traditional wreath.  You will need: Joy® Iron On Embroidered Letter sheet - Gold Script Kunin Classics™ Felt 9” x 12” Craft Cuts– Red, Orange, Yellow, Apple Green, Lagoon, Royal Blue, Orchid, Pirate Green, Neon Green, Gold and Goldenrod (one each) Kunin Premium™ Felt 9” x 12” Craft Cuts– White and Black (two each). Expo International – Claudia 2” Fan and Lattice Lace.  Ric Rac assorted Rayon – Red, Orange, Yellow, Green, Light Blue, Royal…

Rustic Happy Fall Y'all Pumpkin Sign

HAPPY FALL Y'ALL! I am always on the look out for cute items that can be upcycled to create one of a kind home decor pieces.  This rustic pallet pumpkin was just calling out to me from the Target dollar spot and with the addition of some Joy® iron-on embroidered letters, it quickly becomes a custom keepsake. Select a combination of white Joy® iron-on embroidered letters to spell out your message. To create the apostrophe, I carefully cut the leg from the capital letter Q with a pair of detail scissors. Place the embroidered letters on an old towel in a cardboard box…

Back to School Welcome Banner

Create a "Back to School" welcome banner for your favorite teacher's classroom! Materials: JOY® Embroidered Letters 9” x 12” sheets of Kunin Classicfelt -Black , Gray, Sandstone, Candy Pink and Gold Craft glue Glitter glue Cardstock Ruler, pencils, scissors 4-foot length of ribbon Instructions: Draw a simple pencil pattern (5 pieces as shown) on cardstock and cut out.   Trace and trim each pattern piece seven times on the appropriate color of felt. Glue the pencil pieces together, overlapping as shown and let dry. 4. Peel back liner paper from the JOY letters and attach to the center of each pencil, spelling…

Scrabble-Inspired Tote Bag

I am all about recycling, but most of the tote bags that the grocery stores sell are not very cute or crafty. So in honor of family game night, I created a Scrabble-inspired bag to tote around town! This project makes the perfect quick and easy handmade gift to create for Mom for Mother's Day! Decide what words you want to spell and how they'll connect, making sure the arrangement will fit on the front of your tote bag. Draw a grid of square tiles on graph paper to fit each of your letters. I selected the Joy 1.5" Cooper Style…

Happiness Pillow

Joy® Iron-on embroidered letters in white are great for creating any color you can imagine! You can use dye, markers and even acrylic paint! To Make this Happiness Pillow you'll need: Joy® Embroidered Iron-on Letters - Letter Shop White  Acrylic Paint and Paintbrush NEW Joy® Iron-on Embroidered Flower Appliqué    Canvas Pillow Blank Pillow Form or Polyfil Iron Instructions: 1. Paint each letter to create a rainbow of H-A-P-P-I-N-E-S-S.  Set aside and let dry. 2.  Insert cardboard into pillow blank then paint the pillow with white and light blue paint.  Let dry. 3. Set iron on cotton setting; approx. 350 degrees,…
closearrow-circle-o-downtagtagsminus-circlefacebook-squaretruckpinterest-squareinstagrammenu
0
    0
    Shopping Cart
    Your cart is emptyReturn to Shop